


![]()
Comments are made using translation software.
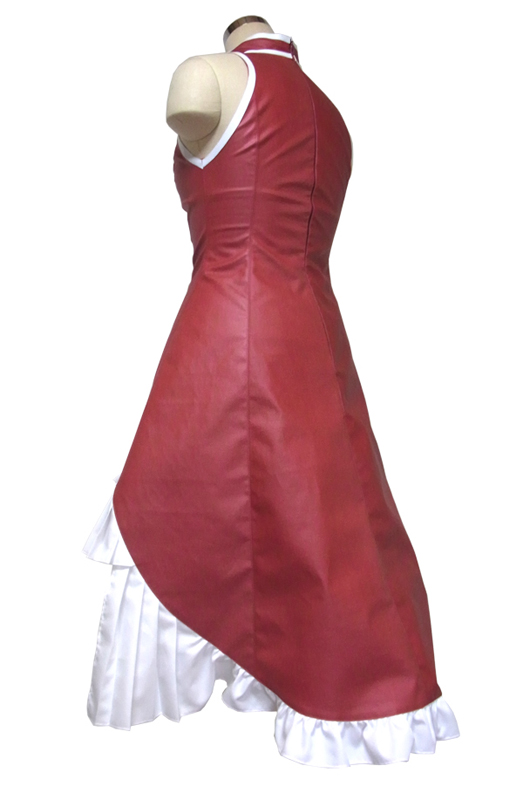
This is the pattern for a dress with a deeply opened front hem.
The base is made of synthetic leather.
If using regular fabric, please apply fusible interlining to the lining collar to give it stiffness.
Due to some challenging design aspects, the difficulty level is slightly higher.
Please note that the pattern for the frill section is not included.
The pattern includes only the red dress shown in the reference photo. Other patterns are not included.
After printing, paste it according to the pasting line,Cut and use.
The pattern has a seam allowance, so it can be used as is.

I'm not so good at English.
So all explanations/instructions were translated using AI.
This is not always perfect and I apologise for any parts that are difficult to follow.
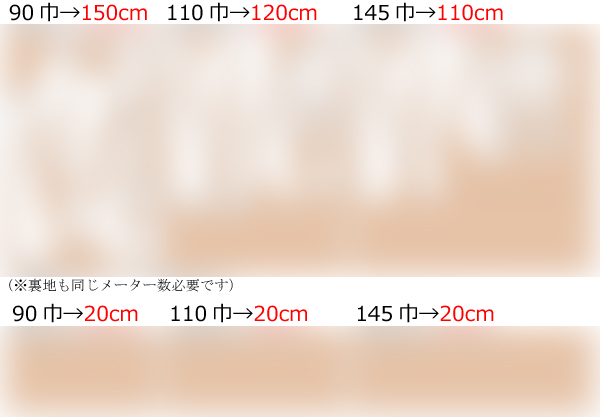
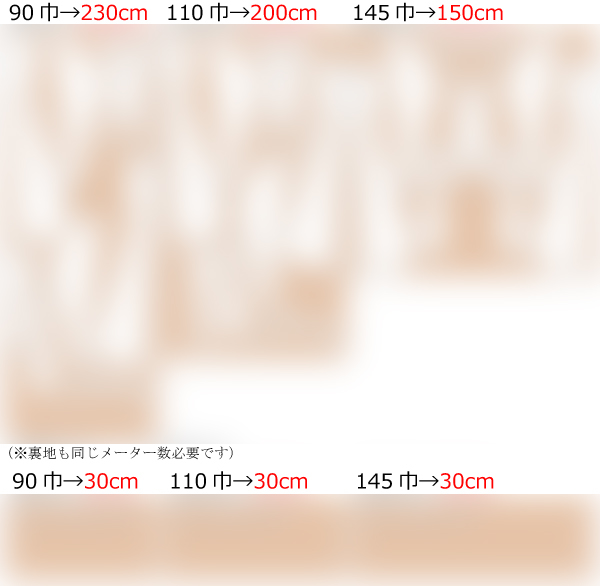
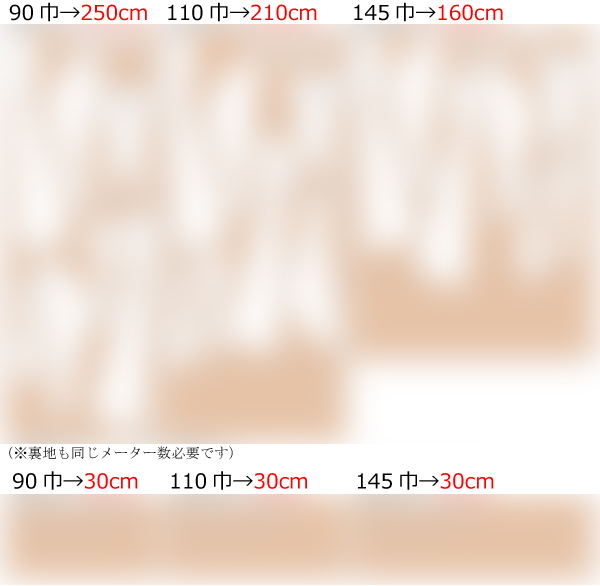
* Use materials that do not fray at the edges when cut for [Chest decorative fabric] and [Armhole decorative fabric].In Japan, enamel materials like "Skole" and "Larissa" are commonly used.
(1) Sew the sides and shoulders of the “Front bodice,” “Front bodice side,” “Back bodice,” and “Back bodice side” together. Then, open the seam allowance with top stitching and trim the excess seam allowance (follow the same steps for the lining).
(2) Sew the “Back bodice” up to the “Stopping point of stitching,” then press the seam allowance open with an iron (follow the same steps for the lining).
(3) Attach the “Collar” to the “Bodice,” then press the seam allowance open with an iron (follow the same steps for the lining).
* For tight angles in the seam allowance, clip the seam allowance with scissors or similar tools to prevent fabric tension and allow it to settle neatly.
(4) Pre-fold the seam allowances for the outer edge of the “Collar,” armholes, Chest decoration hole, and hem using an iron to shape them.
* Clip the seam allowance at tight angles or areas where the fabric is taut, and press them neatly with an iron.
(5) Apply stay tape to the “Concealed Zipper Attachment Position” on the “Back bodice,” then attach the zipper.
(6) Secure the seam allowance of the “Back bodice Lining” to the seam allowance of the zipper.
(7) Stitch the “Bodice” and “Lining” together at the collar top, armholes, and hem in that order.
* If adding decorations to the hem, insert them during this step.
(8) Sew the [Chest decorative fabric] to the “Bodice” and the [Armhole decorative fabric] to the armholes to complete the assembly.
* Before attaching the [Chest decorative fabric], temporarily secure the neckline of the “Bodice” and “Lining” to make it easier to attach the [Chest decorative fabric].
If you cannot see the SHOP due to 403 error
Price: ¥800 (JPY)
Approx. USD — / EUR — (for reference)
![]()
![]()
Children's 140 size
Bust 77cm Waist 58cm 12sheets of A4 size

Children's 10 size
Bust 30.3in Waist 22.8in 14sheets of letter size

Ladies' S size
Bust 84.5cm Waist 64.5cm 15sheets of A4 size
Ladies' S size
Bust 33.3in Waist 25.8in 15sheets of letter size
Ladies' M size
Bust 91cm Waist 70.5cm 15sheets of A4 size

Ladies' M size
Bust 35.8in Waist 27.8in 17sheets of letter size
Ladies' L size
Bust 101.5cm Waist 80cm 16sheets of A4 size

Ladies' L size
Bust 40in Waist 31.5in 18sheets of letter size
Ladies' LL size
Bust 105.5cm Waist 83cm 18sheets of A4 size
Ladies' LL size
Bust 41.5in Waist 32.7in 20sheets of letter size
Men's L size
Bust 110cm Waist 85.5cm 19sheets of A4 size
Men's L size
Bust 43.3in Waist 33.7in 21sheets of letter size
Men's LL size
Bust 115cm Waist 91cm 20sheets of A4 size
Men's LL size
Bust 45.3in Waist 35.8in 21sheets of letter size


