


![]()
Comments are made using translation software.
Simple sewing instructions are included on the pattern sheet.
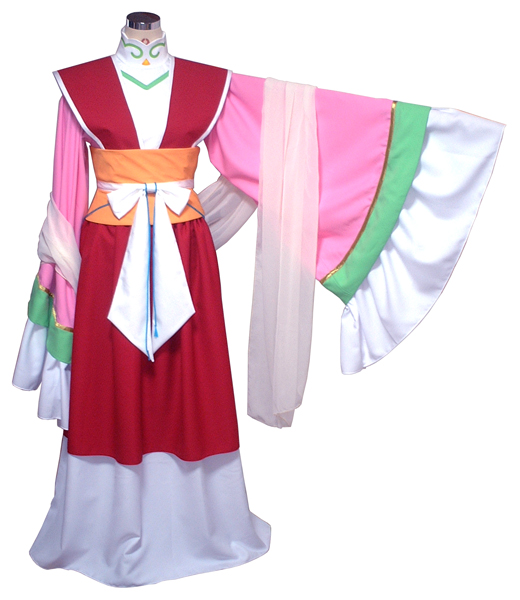
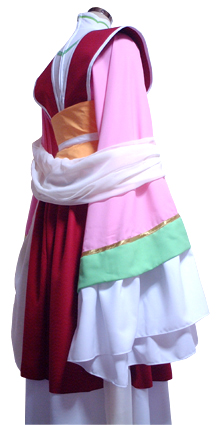
This is a pattern for a fusion-style Hanfu, which was highly requested.
It is not an authentic Hanfu, but rather a fusion design suitable for cosplay, stage, or party costumes.
If you wish to make an authentic Hanfu, we recommend referring to professional reference books.
The top opens with a zipper, and the skirt is an elastic waistband style.
The obi belt has a unique design and is attached with side Velcro, creating a wide silhouette both at the top and bottom.
The skirt uses a large rectangular piece of fabric, so we recommend cutting it using a ruler or measuring tape instead of printing.
For this reason, the required vertical and horizontal measurements are listed.
If you prefer not to print the skirt part, please refer to the specified print page range for each size (e.g. 1-X pages).
Please refer to that information to reduce the number of printed pages.
The detachable collar is simply held in place by the belt, making it very easy to wear.
After printing, cut along the joining lines. The seam allowances are already included, so you can use the pattern as is.

I'm not so good at English.
So all explanations/instructions were translated using AI.
This is not always perfect and I apologise for any parts that are difficult to follow.
Bodice Construction
(1) Sew the front bodice darts and press them downward with an iron.
(2) Overlock the side seams of the front bodice, side front, side back, and back bodice. Sew them together and press the seam allowances open.
* The center back seam will be finished after attaching the collar.
(3) Overlock and sew the shoulders. Press the seam allowances open.
(4) Sew the outer collar (one layer) to the bodice and press the seam allowances open.
(5) Attach fusible interfacing to the inner collar. Sew the top edges of the two collars together, trim seam allowances, turn inside out, and press to shape.
(6) Overlock the center back seam and apply stay tape.
(7) Overlock the hem of the bodice, fold up 1 cm, and topstitch to finish.
(8) Attach the open zipper to the center back.
(9) Finish the hem of the sleeve frill using rolled hem or narrow hem stitching.
(10) Finish the side edges of the sleeve frill using rolled hem or narrow hem stitching.
* You can also sew the edges together and then overlock.
(11) Sew the side edges of the sleeve decorations, press the seams open to form a loop.
* Make 4 pieces using the same method.
(12) Place 2 sleeve decorations right sides together, sew the hem side, turn inside out, and press to shape.
* Make 2 sets.
(13) Overlock the sides and hems of the sleeves, sew the sides, and press the seams open.
(14) Layer the sleeve frill and sleeve decoration on the sleeve hem and sew them together with the bias trim.
(15) Attach the sleeves to the bodice and overlock the armholes.
Shoulder Collar Construction
* Use slightly stiff fusible interfacing for the shoulder collar to give it structure.
(1) Apply fusible interfacing to the two inner shoulder collar pieces.
(2) Sew the two outer collar pieces together and press the seams open.
* Repeat the same for the inner pieces.
(3) Layer the outer and inner collars together and topstitch the bias tape placement line to secure.
(4) Attach the bias tape.
Ribbon Construction
* The ribbon is made by sewing it inside out, turning it right side out, and shaping it with an iron.
(1) Apply fusible interfacing to the ribbon base and upper ribbon piece.
(2) Sew each ribbon, leaving a gap to turn it inside out.
(3) Turn the ribbons right side out and press to shape.
(4) Wrap the upper and lower ribbon with the ribbon base and hand-stitch to secure.
Obi Belt Construction
* The Velcro should be positioned at the right side of the waist.
* Before sewing, confirm whether the Velcro faces outward or inward when worn.
* The rough side of the Velcro should face outward; the soft side should face inward.
(1) Attach stiff fusible interfacing to the inner top and bottom parts of the obi belt.
(2) Sew the inner top and bottom parts of the obi together and press the seams open.
(3) Sew the soft side of the Velcro facing inward on the inner obi.
(4) Sew the outer top and bottom parts of the obi together and press the seams open.
(5) Attach bias tape to the seam line of the outer obi where indicated.
(6) Place the outer and inner obi right sides together, leaving a gap for turning, and sew.
(7) Turn the obi right side out, press to shape, and close the opening with a stitch.
(8) Sew the rough side of the Velcro to the outside and attach the ribbon.
Skirt Construction
* If you are not printing the skirt pattern, prepare the two skirt rectangles as specified in the sleeve instructions.
(1) Overlock the side and bottom edges of both the inner and outer skirt panels.
(2) Sew the side seams of both skirt layers and press the seam allowances open.
(3) Layer the skirts, fold down at the marked fold line, leave an opening for the elastic, and topstitch.
* If layering is difficult, you can enclose one layer inside a triple-fold hem and sew it that way.
(4) Insert the elastic into the waistband.
If you cannot see the SHOP due to 403 error
Price: ¥800 (JPY)
Approx. USD — / EUR — (for reference)
![]()

bast 86cm waist 65.5cm Body length 39.5cm Skirt length 111cm 50 sheets of A4 size(or legal size)
* If you are not printing the skirt pattern, please set the print range to pages 1-26.
bast 94cm waist 70cm Body length 41.5cm Skirt length 114.5cm 61 sheets of A4 size(or legal size)
* If you are not printing the skirt pattern, please set the print range to pages 1-31.
bast 101cm waist 74cm Body length 43.5cm Skirt length 117cm 63 sheets of A4 size(or legal size)
* If you are not printing the skirt pattern, please set the print range to pages 1-32.
bast 107cm waist 80cm Body length 45.5cm Skirt length 123cm 63 sheets of A4 size(or legal size)
* If you are not printing the skirt pattern, please set the print range to pages 1-32.


