


![]()
This blouse with a stand collar can be customized and used when making cosplay costumes.
You can change the collar or sleeve design of the pattern to match the character image.
It can also be used as a regular everyday-wear blouse pattern.
After printing the pattern, adjust the sleeve length to your preferred length. This will give you a perfect fit.
The body has a slightly relaxed silhouette, so if you use it for cosplay, adding waist darts to the pattern will create a cleaner line.
The explanation of the stand collar is a little simplified, so it may not be beginner-friendly.
The men’s pattern has no side darts, features a wider shoulder width, and has a straighter waist shape.
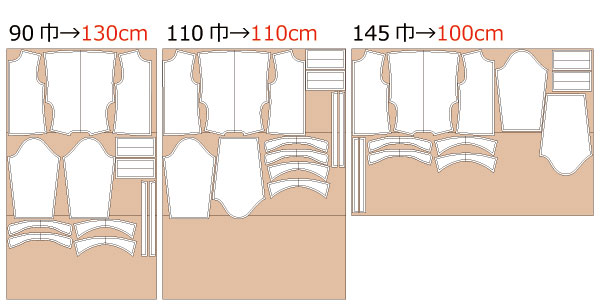
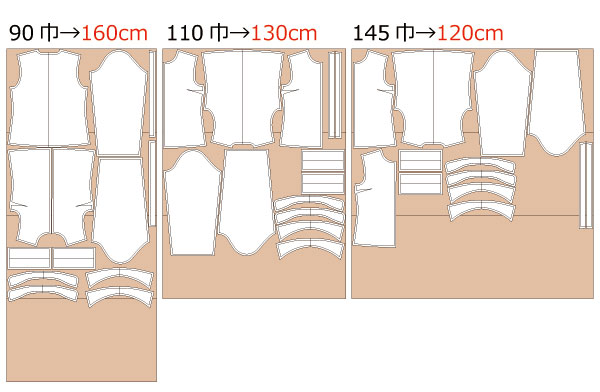
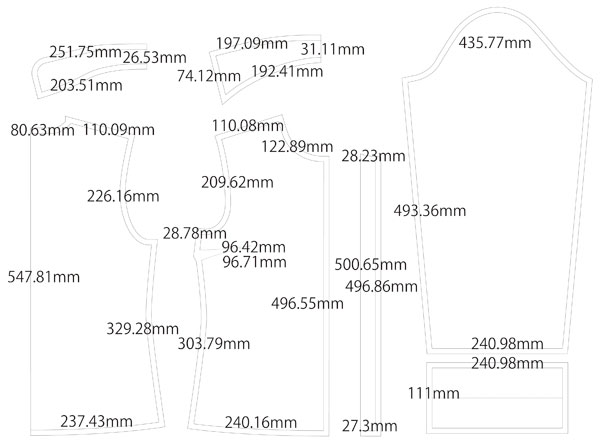
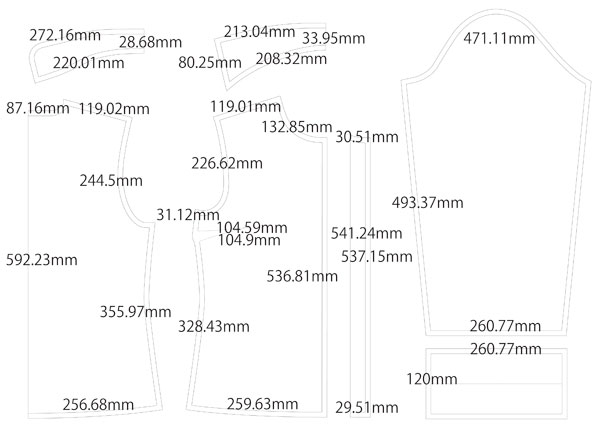
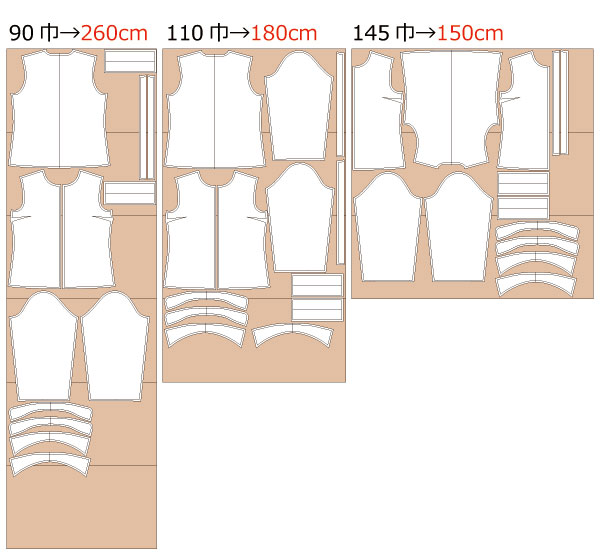
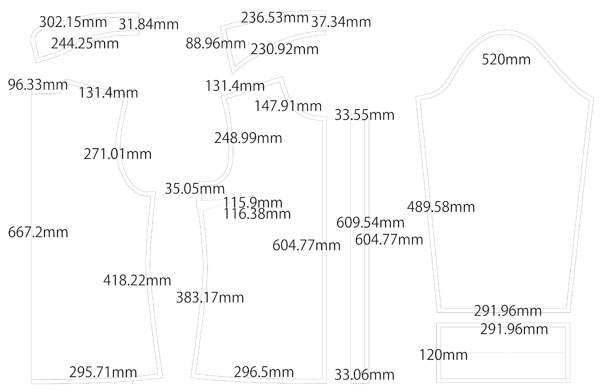
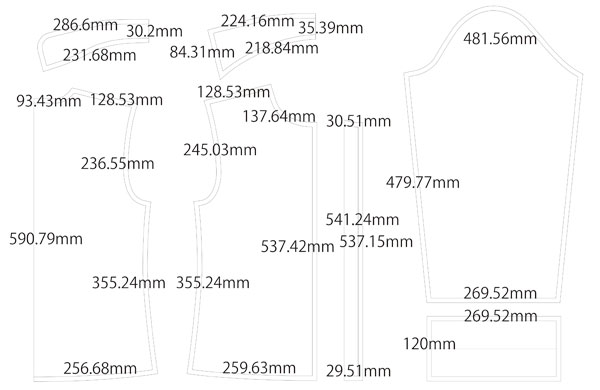
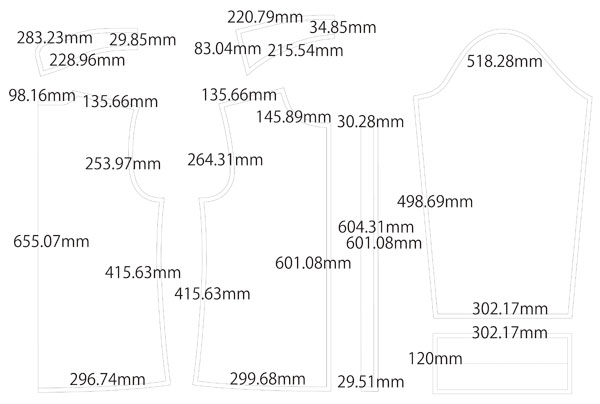
After printing, align and tape the joining lines, then cut out the pieces. Seam allowances are already included, so you can use the pattern as it is.


What is "Grainline""cut on fold"? Please refer to this page
(1) Sew the darts on the “Front bodice” and press the seam allowance down with an iron.
*This step is only for women’s sizes. Children’s sizes and men’s sizes do not have darts.*
How to sew darts. Please refer to this page
(2) Serge/overlock the shoulders and sides of the “Front bodice” and “Back bodice”, sew them together, and press the seams open with an iron.
How to Serge/overlock (sewing machine & overlock sewing machine). Please refer to this page
(3) Apply fusible interlining to the “Collar”, “Collar stand”, and “Facing”.
(4) Place the “Collar” right sides together, leave the collar-stand opening unsewn, sew around, turn it right side out, and press with an iron.
How to make collar. Please refer to this page
(5) With the “Collar stand” right sides together, insert the “Collar” into the collar position, sew, turn inside out, and topstitch to secure.
*Start sewing the body-side of the “Collar stand” while leaving about 1 cm (≈0.5 inch) of seam allowance unsewn.*
*Folding the 1 cm allowance with an iron beforehand will make this step easier.*
How to sew Collar stand. Please refer to this page
(6) Serge/overlock the edge of the “Facing”.
(7) Sew the “Facing” to the “Body”.
How to sew Facing and Hem. Please refer to this page
(8) Insert the “Collar stand” into the “Body” neckline and sew with a sewing machine.
(9) Serge/overlock the side of the “Sleeve”, sew it together, and press the seam open with an iron.
How to sew sleeves and sleeve cuffs. Please refer to this page
(10) Sew the side of the “Cuff”, fold it along the center line, fold the 1 cm (≈0.5 inch) seam allowance inside, and prepare it to insert over the sleeve hem.
(11) Sandwich (insert) the sleeve hem inside the “Cuff” and sew.
(12) Sew the “Sleeve” to the “Body” and serge/overlock the seam.
(13) Serge/overlock the hem of the “Body”, fold up 1 cm (≈0.5 inch), and sew by machine.
(14) Make buttonholes and sew on the buttons.
How to sew on buttons. Please refer to this page
How to make buttonholes. Please refer to this page
![]()
Free Paper Patterns are possible because of your support.
If you use our patterns, please share them on social media and tell your friends.
Your support helps DRCOS continue to provide patterns in the future.
![]()
![]()
Children's-100
shoulder width26cm bust60cm waist58.5cm length35.5cm 7sheets of A4 size (or legal size)


Children's-4
Shoulder width10.2in bust23.6in waist23in length14in 7sheets of letter size

Children's-120
shoulder width30cm bust67.5cm waist65.5cm length41.5cm 8sheets of A4 size (or legal size)

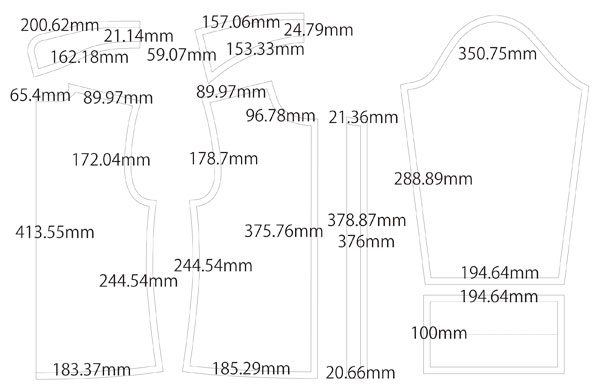
Children's-8
Shoulder width11.8in bust26.5in waist25.8in length16.2in 9sheets of letter size
Children's-140
shoulder width34cm bust77cm waist75cm length47cm 10sheets of A4 size (or legal size)
Children's-10
shoulder width13.4in bust30.1in waist29.4in length18.6in 10sheets of letter size
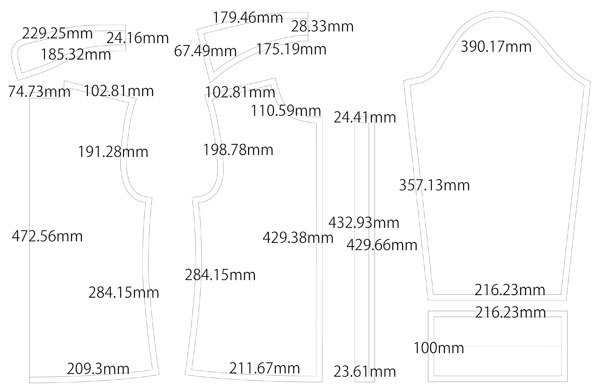
Ladies'-S
shoulder width36.5cm bust87cm waist83cm length54.5cm 12sheets of A4 size (or legal size)
Ladies'-S
Shoulder width14.4in bust34.2in waist32.7in length21.5in 13sheets of letter size
Ladies'-M
shoulder width39.5cm bust94cm waist90cm length59cm 14sheets of A4 size (or legal size)

Ladies'-M
Shoulder width15.6in bust37in waist35.3in length23.3in 15sheets of letter size
Ladies'-L
shoulder width42.5cm bust100.5cm waist96cm length63.5cm 15sheets of A4 size (or legal size)


Ladies'-L
Shoulder width16.7in bust39.6in waist37.8in length24.9in 16sheets of letter size
Ladies'-LL
shoulder width43.5cm bust108.5cm waist103.5cm length66.5cm 18sheets of A4 size (or legal size)
Ladies'-LL
Shoulder width17.1in bust42.6in waist40.8in length26.2in 17sheets of letter size
Men's-S
shoulder width43cm bust94cm waist91.5cm length59cm 15sheets of A4 size (or legal size)

Men's-S
Shoulder width16.9in bust37.1in waist35.9in length23.2in 15sheets of letter size
Men's-M
shoulder width44cm bust102cm waist99.5cm length64cm 15sheets of A4 size (or legal size)

Men's-M
Shoulder width17.3in bust40.2in waist39.2in length25.1in 17sheets of letter size
Men's-L
shoulder width45cm bust110cm waist107.5cm length65.5cm 17sheets of A4 size (or legal size)
Men's-L
Shoulder width17.7in bust43.4in waist42.2in length25.7in 19sheets of letter size
Men's-LL
shoulder width46cm bust117cm waist114cm length67.5cm 18sheets of A4 size (or legal size)

Men's-LL
Shoulder width18.1in bust46in waist44.8in length26.5in 19sheets of letter size


