


![]()
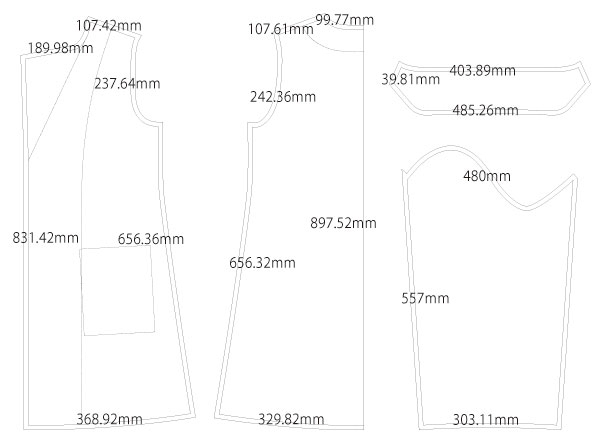
This is a free sewing pattern for a loose-fit coat with a tailored collar. The relaxed design provides extra ease and comfort, making it perfect for layering over other garments. The pattern does not include darts, making it ideal as a base for customization and modifications to suit your style.
If you prefer a sharper, more fitted silhouette, please refer to our patterns for a Slim-Fit Coat or a Tailored Collar Long Coat. This design is simplified compared to a traditional tailored collar, making it beginner-friendly while still allowing experienced sewists to adapt it using standard tailoring techniques.
The facing lines are included in the pattern, enabling you to add a lining for a more professional finish. The pattern includes a built-in seam allowance (S/A), so you can use it immediately after printing. Simply align the joining lines, cut out the pieces, and start sewing.


The production process is explained with translation software.
If you have any suggestions on how to write like this, please let us know at info@dr-cos.com
We operate this site with your cooperation.
This is not a full-fledged method of making tailored collars, but rather a simplified method, so the drawings are suitable for beginners.
Advanced users should change the process of making tailored collars.
When facing, please use the seam allowance on the Facing line.
(1) Attach "pocket" to the pocket position on the body first.
* The "pocket" is the simplest one, but you can omit it if you don't need it.
(2) Attach fusible interlinings (collar, body facing, lapel).
(3) Sew "body facing" together,Press seam allowances open with an iron,Serging the outside.
(4) Serging the shoulder and side of the "Body",Sew the shoulder and the side of "Body" together,Press seam allowances open with an iron.
(5) Sew the "Collar" to the collar position of the "Body" and "facing".
* After attaching the "Collar",Iron the "Collar" after attaching the "Collar",After attaching the "Collar", iron and cut into the seam allowance to shape it.
(6) Turn the garment inside out, sewing everything except the hem.
* It is easier to iron the hem into shape before finishing.
(7) Serging the sides of the "Sleeve" and sewing them together,Iron the sides of the "Sleeve",Serging the hem, fold up 0.5 inch and sew with a sewing machine.
(8) Attach the "Sleeve" to the "Body" and Serging.
(9) Serging the hem, folding it up and sewing it with a sewing machine.
(10) Use basting threads to secure the parts that tend to shift during fabrication to prevent shifting, so that the finished line will be clean.
![]()
Free Paper Patterns are possible because of your support.
If you use our patterns, please share them on social media and tell your friends.
Your support helps DRCOS continue to provide patterns in the future.
![]()
![]()
Children's-100
bust65cm length54cm 10sheets of A4 size (or legal size)

Children's-4
bust25.6in length21.3in 11sheets of letter size

Children's-120
bust73cm length65cm 13sheets of A4 size (or legal size)
Children's-8
bust28.7in length25.6in 14sheets of letter size
Children's-140
bust85cm length76cm 18sheets of A4 size (or legal size)

Children's-10
bust33.5in length29.9in 18sheets of letter size
Ladies'-S
bust96cm length87cm 22sheets of A4 size (or legal size)
Ladies'-S
bust37.8in length34.3in 22sheets of letter size
Ladies'-M
bust103.5cm length89.5cm 23sheets of A4 size (or legal size)
Ladies'-M
bust41.7in length25in 24sheets of letter size
Ladies'-L
bust111.5cm length92.5cm 25sheets of A4 size (or legal size)

Ladies'-L
bust43.9in length36.4in 25sheets of letter size
Ladies'-LL
bust117.5cm length95cm 27sheets of A4 size (or legal size)
Ladies'-LL
bust46.3in length37.4in 27sheets of letter size
Men's-L
bust122cm length97cm 27sheets of A4 size (or legal size)
Men's-L
bust48in length38.2in 28sheets of letter size
Men's-LL
bust127cm length98cm 28sheets of A4 size (or legal size)
Men's-LL
bust50in length38.6in 30sheets of letter size


