


![]()
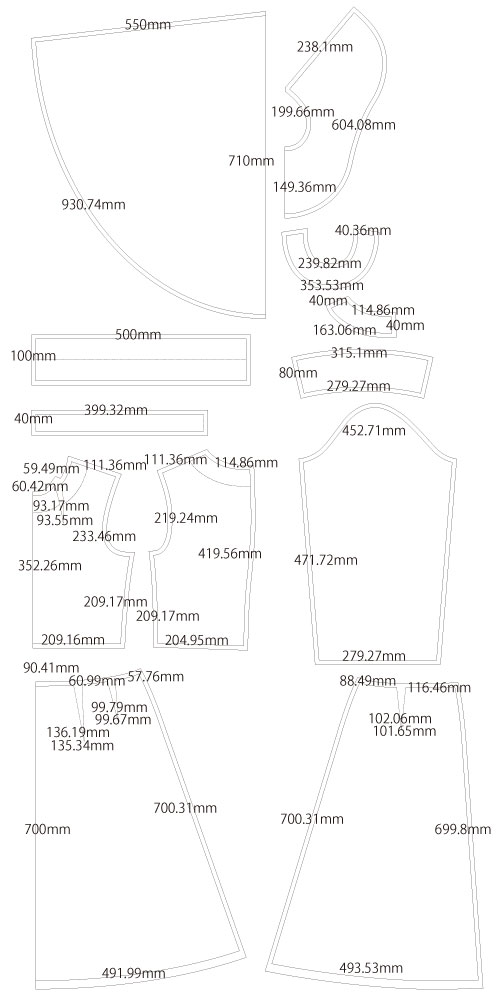
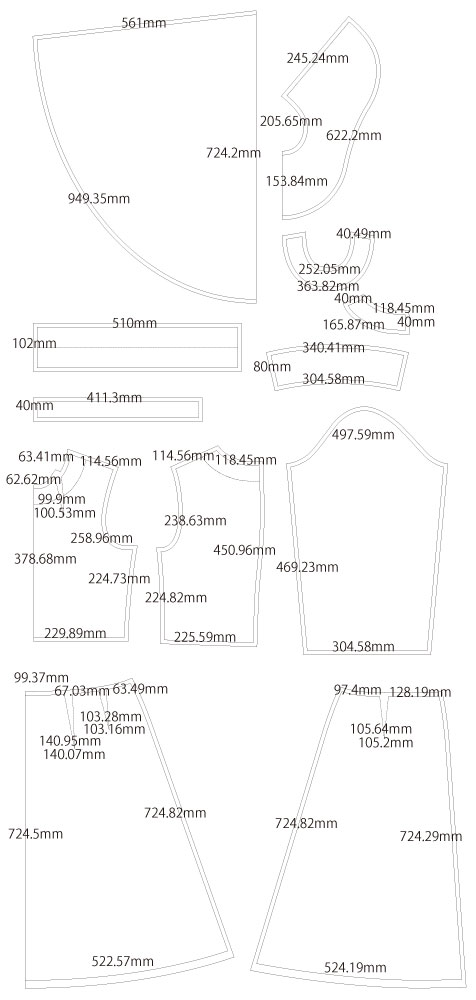
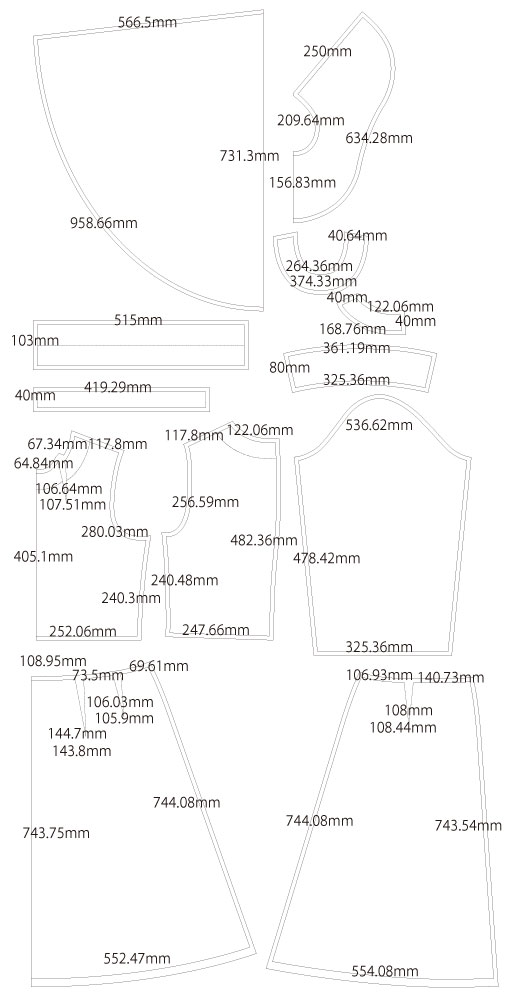
This is a free sewing pattern and tutorial for a nun costume, drafted with a slightly high-waist design. Seam allowances (S/A) are included so it can be used as is.
Originally designed years ago for cosplay purposes, this is not an exact replica of an authentic nun's habit.
The bodice features side darts and neck darts to create a more fitted shape and slightly emphasize the bust. The dress is cut at the waistline and includes a stand collar, with a back-opening zipper for a slim fit.
The head veil is designed to be secured with a hair comb and snap buttons, preventing it from shifting during wear.
Fabric choice will affect the final look—use softer materials for a flowing silhouette, or stiffer fabrics for a structured appearance.
While the design is a bit more intricate than everyday clothing, there are no extremely difficult steps, making it accessible to intermediate sewists.
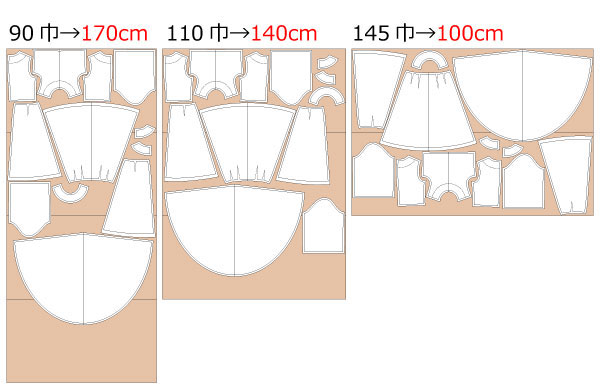
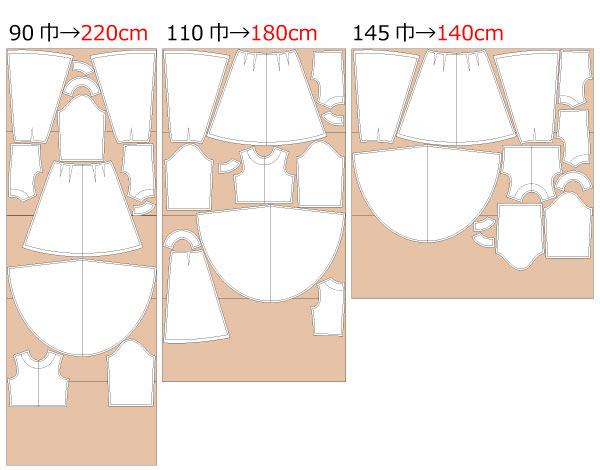
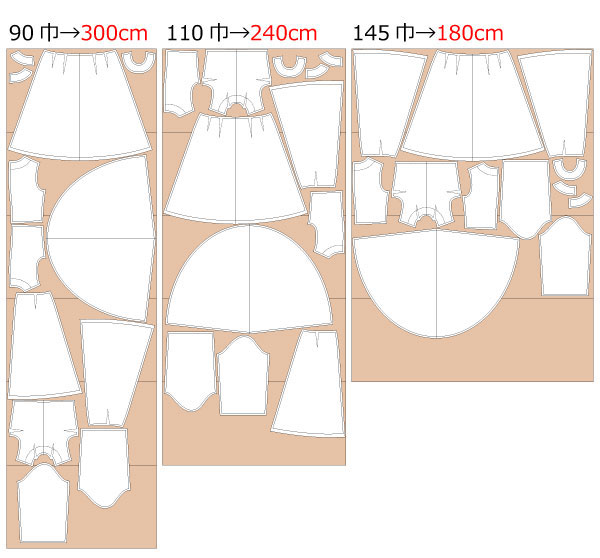
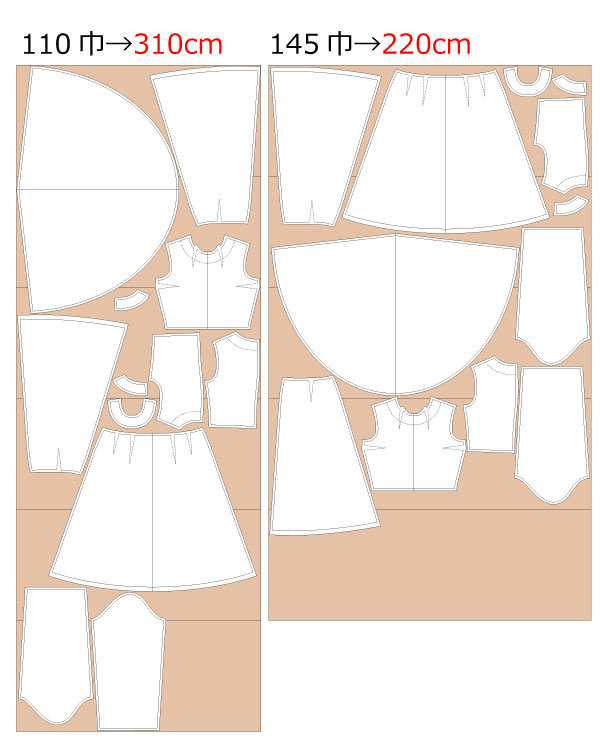
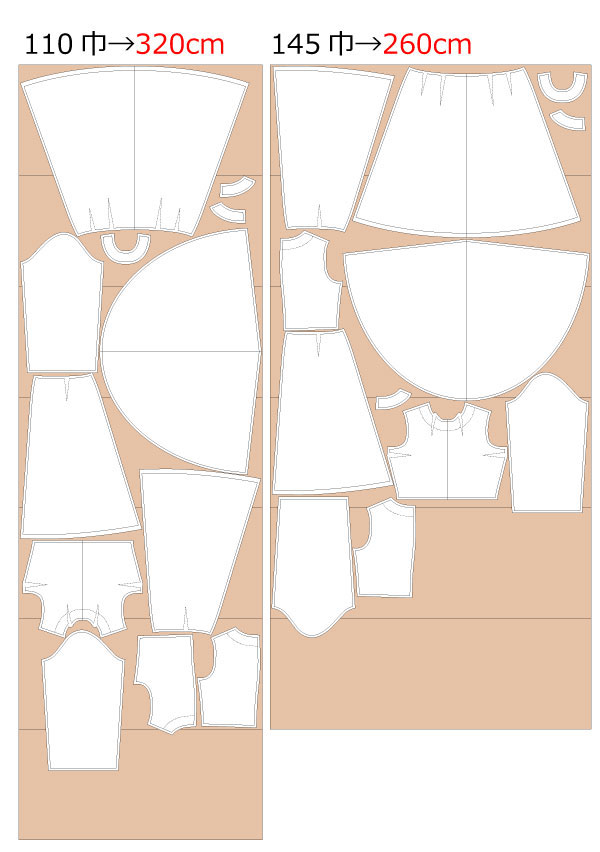
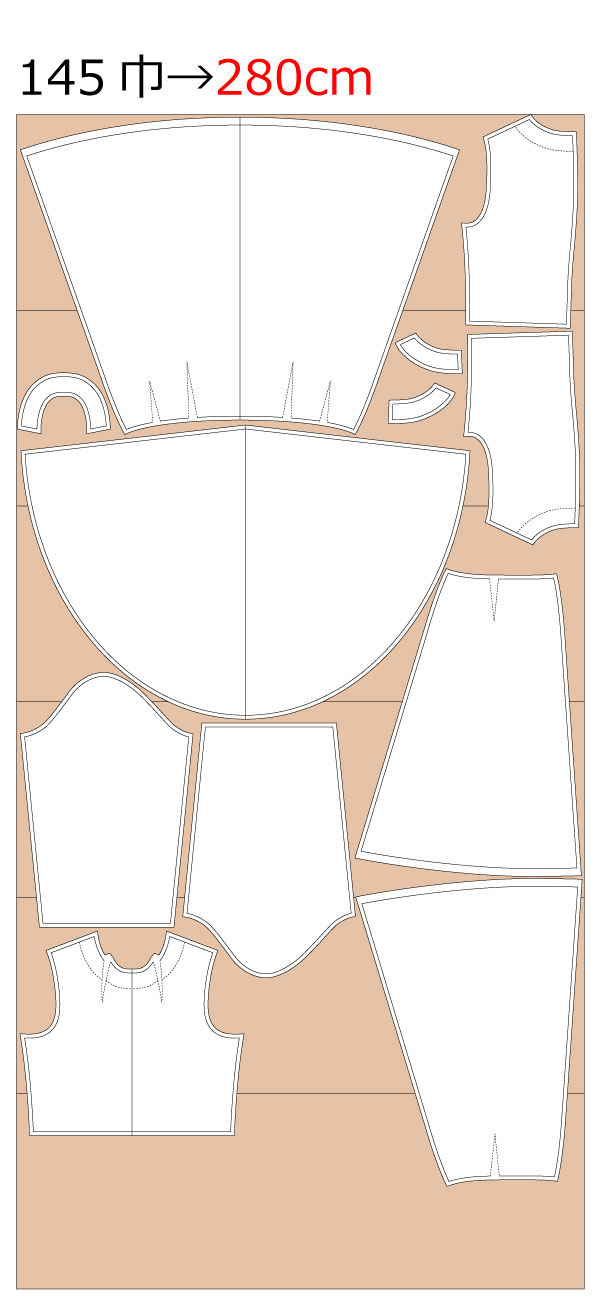
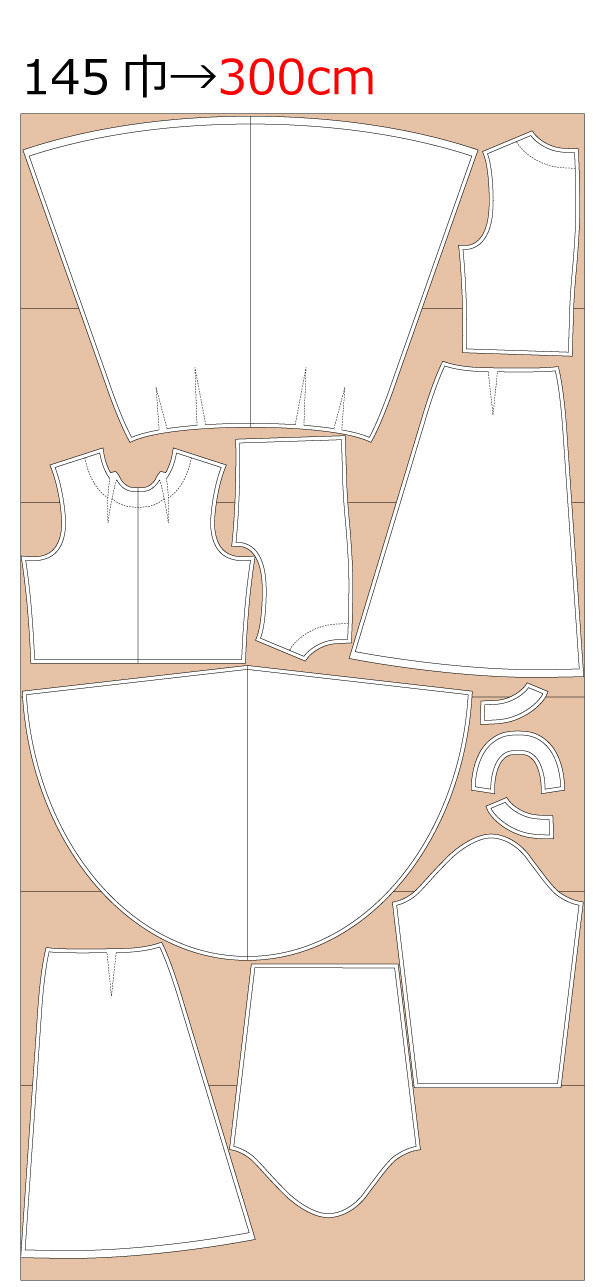
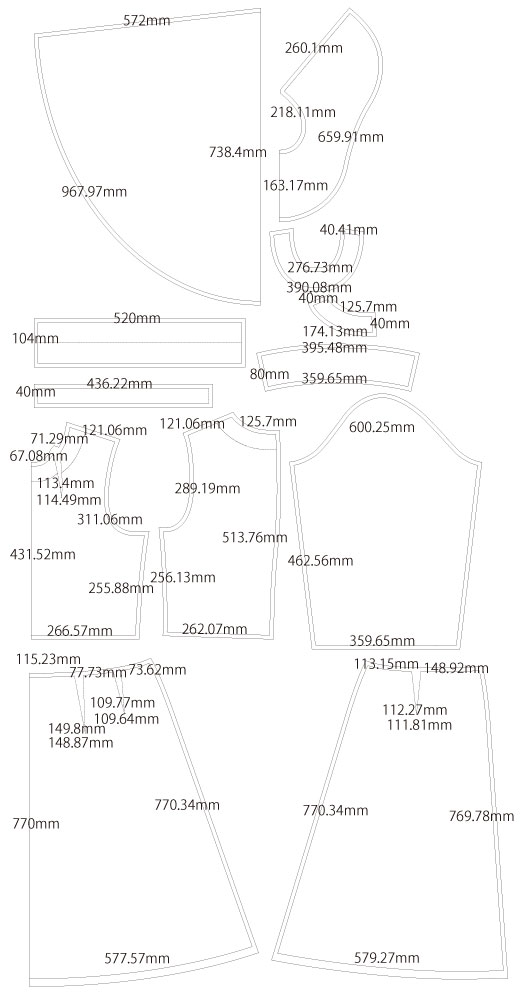
After printing, align the pages along the guide lines, cut along the edges, and the pattern is ready to use.


The production process is explained with translation software.
If you have any suggestions on how to write like this, please let us know at info@dr-cos.com
We operate this site with your cooperation.
(1) Iron fusible interlining on "Collar stand", "Collar", "facing(Front&Back)", "Cuff" and "Head veil belt".
(2) Sew and iron down each dart of "Front bodice" and "Skirt".
(3) Serge/overlock the shoulders and sides of the "Front bodice" and "Back bodice" and sew them together, then press seam allowances open with an iron.
(4) Serge/overlock the front and back bodice of the "Skirt" and press seam allowances open.
* Do not serge/overlock the back center line of "Skirt" at this time.
(5) After sewing "Body" and "Skirt" together, serge/overlock and iron down the seam allowance.
(6) Serge/overlock the back center line of "Back bodice" to "Skirt" and sew to the sewing stop position, then press seam allowances open with an iron.
(7) Fold up the hem of "Skirt" by 1 inch with an iron and sew it with a sewing machine.
(8) Stick stay tape where the zipper is to be attached, and sew on the invisible zip.
* Use a 56cm (22") invisible zip.
(9) Sew "facing" together, serge/overlock the outside, and sew it to "Body".
* When turning "facing" inside out, cut a slit in the seam allowance to prevent the fabric from being pulled.
(10) Serge/overlock the sides of the "Sleeve", sew them together, and press seam allowances open with an iron.
(11) Fold the "Cuff" sleeve side in advance with an iron to give it a shape.
(12) Sew the sides of the "Cuff" together to form a loop, then sew the two pieces together and turn them inside out so that they can be tucked in.
(13) Pin the "Cuff" between the "Sleeve" and sew, then fold up the cuffs and iron to settle them.
(14) After sewing the "Sleeve" to the "Body", serge/overlock the armholes.
(15) Sew "Collar stand" to "Collar", cut a seam allowance, and press seam allowances open with an iron.
(16) Fold the open zipper inward in advance by ironing (both of them).
(17) Sew the two collars together with the zipper part open, cut into the seam allowance, turn inside out and iron into shape.
(18) Attach the open zipper at the open zipper position.
(19) Serge/overlock all around the "head veil", iron in a 0.5 inch (≈1cm) fold, and sew with a sewing machine.
(20) Fold the "Head veil belt" over the folded part at the end of the "Head veil belt" and fold it into a shape that can be tucked in along the center line fold line.
(21) Turn over and, with the first folded-in part folded, sew the sides together and iron into shape.
(22) Sew the veil together while tucking in the veil to match the tucking-in position.
(23) Attach the snap buttons and complete by attaching a hair comb.
* If you do not have a hair comb, use hairpins instead.
![]()
Free Paper Patterns are possible because of your support.
If you use our patterns, please share them on social media and tell your friends.
Your support helps DRCOS continue to provide patterns in the future.
![]()
![]()
Children's-100
bust61.5cm waist58.5cm length69.5cm 17sheets of A4 size (or legal size)

Children's-4
bust24.2in waist23in length27.4in 17sheets of letter size

Children's-120
bust70.5cm waist63.5cm length82.5cm 20sheets of A4 size (or legal size)
Children's-8
bust27.8in waist25in length32.5in 20sheets of letter size
Children's-140
bust79cm waist69.5cm length96.5cm 26sheets of A4 size (or legal size)
Children's-10
bust31.1in waist27.4in length38in 26sheets of letter size
Ladies'-S
bust89cm waist75cm length106cm 32sheets of A4 size (or legal size)
Ladies'-S
bust35in waist29.5in length41.7in 32sheets of letter size
Ladies'-M
bust96cm waist81.5cm length109cm 34sheets of A4 size (or legal size)


Ladies'-M
bust37.8in waist32.1in length42.9in 34sheets of letter size
Ladies'-L
bust104cm waist89.3cm length110cm 35sheets of A4 size (or legal size)
Ladies'-L
bust40.9in waist35.2in length43.3in 35sheets of letter size
Ladies'-LL
bust110cm waist95cm length113cm 36sheets of A4 size (or legal size)

Ladies'-LL
bust43.3in waist37.4in length44.5in 36sheets of letter size
Men's-S
bust91.5cm waist83cm length111.5cm 32sheets of A4 size (or legal size)
Men's-S
bust36in waist32.7in length43.9in 32sheets of letter size
Men's-M
bust100cm waist91cm length117cm 36sheets of A4 size (or legal size)

Men's-M
bust39.4in waist35.8in length46in 36sheets of letter size
Men's-L
bust108.5cm waist100cm length120cm 38sheets of A4 size (or legal size)
Men's-L
bust42.7in waist39.4in length47.2in 38sheets of letter size
Men's-LL
bust115.5cm waist105.5cm length128cm 41sheets of A4 size (or legal size)
Men's-LL
bust45.5in waist41.5in length50.4in 41sheets of letter size


