


![]()
Comments are made using translation software.
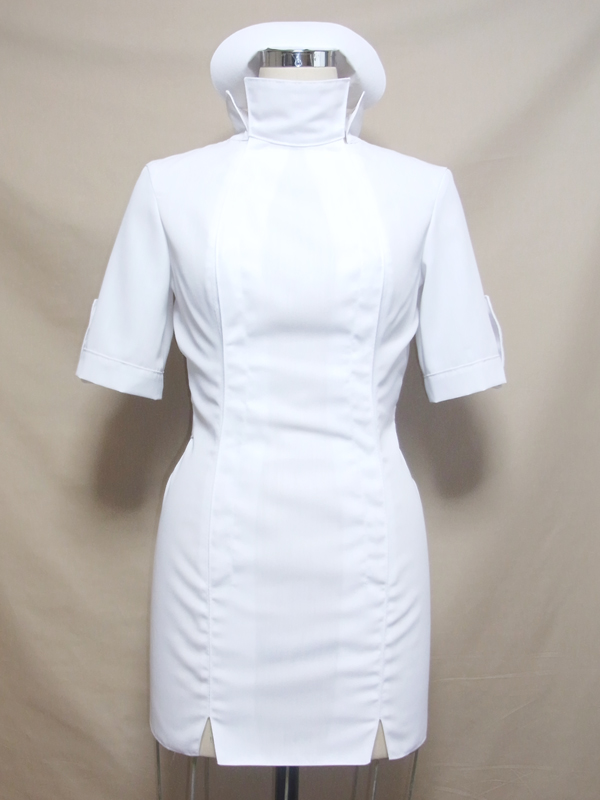
This is the pattern and instructions for a front snap button nurse uniform & nurse cap.
It's designed to be a real mini design, so adjusting the pattern will be necessary when extending the length.
As it's a quite tight design, it's recommended to use fabric with a little stretch or go up one size.
As there's no lining in the construction process, if you want to add lining, you'll need to make the body fabric in two layers.
After printing, paste it according to the pasting line,Cut and use.
The pattern has a seam allowance, so it can be used as is.


I'm not so good at English.
So all explanations/instructions were translated using AI.
This is not always perfect and I apologise for any parts that are difficult to follow.
(1) Apply fusible interlining to the Nurse cap, create French seams, turn inside out, stitch around the edges with topstitching, and attach Sew on snaps.
* Trim the areas where the seam allowance (S/A) interferes.
* For the stiff fusible interlining, bag lining interfacing is recommended.
(2) Apply fusible interlining to the front "Collar" and back "Collar," fold around the neck section first by 1cm (0.5in), then sew them together, shaping the "Collar" to be sandwiched.
(3) Serge/overlock all sides, shoulders, and hems of all "Body" pieces, apply fusible interlining to the "facing" and "Extension parts," then serge/overlock the outer parts.
![]() How to Serge/overlock (sewing machine & overlock sewing machine)
How to Serge/overlock (sewing machine & overlock sewing machine)
(4) Prepare the back strings and "Sleeve" strings beforehand.
* Attach decorative buttons to the "Sleeve" strings later.
(5) Serge/overlock the sides of the "Sleeve," then stitch them together and press seam allowances open with an iron.
(6) Apply fusible interlining to the "Cuff," fold both sides by 1cm (0.5in) each to form a loop, align them along the centerline, and fold to create a sandwiching effect.
* Leave one side slightly extended when folding along the centerline for easier sewing with the machine.
(7) Attach the "Cuff" to the "Sleeve," sandwiching the "Sleeve" strings, and attach the "Sleeve" strings to the "Sleeve" with decorative buttons.
![]() How to sew sleeves and sleeve cuffs
How to sew sleeves and sleeve cuffs
(8) Stitch the center of the "Back bodice," serge/overlock, and fold the seam towards one side.
(9) Stitch the sides of the "Body" and "Back bodice" shoulders together, then press seam allowances open with an iron.
(10) Stitch the back strings while sewing darts.
* Depending on the material, the back strings may hang down, so after sewing one side of the darts, temporarily secure the opposite side of the darts to adjust the length of the strings.
(11) Attach "Extension parts" to the sides of the "Body," then press seam allowances open with an iron.
* Since the back "Collar" will be sandwiched, start sewing 1cm (0.5in) from the top for easier sandwiching.
(12) Sandwich the back "Collar" between the sides of the "Body" and "Back bodice," then sew together.
(13) Fold the hem and slit seam allowances (S/A) by 1cm (0.5in) and shape with topstitching.
(14) Attach the "facing" to the "Front bodice," then shape the slit and hem with topstitching using an iron.
(15) Sandwich the front "Collar" between the sides of the "Front bodice," then sew together.
(16) Secure the "Front bodice" to the sides of the "Body" with topstitching at the fixed positions.
(17) Attach the "Sleeve" to the "Body" and serge/overlock the armhole.
(18) Attach Sew on snaps at the Sew on snap positions.
If you cannot see the SHOP due to 403 error
Price: ¥900 (JPY)
Approx. USD — / EUR — (for reference)
![]()

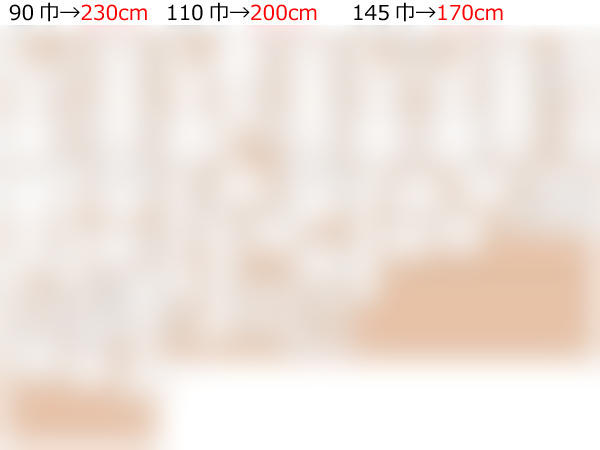
shoulder width15.4in bust32.7in waist24.8in hip33.1in length29.7in 22sheets of A4 size(or legal size)
Sleeve parts 43 size
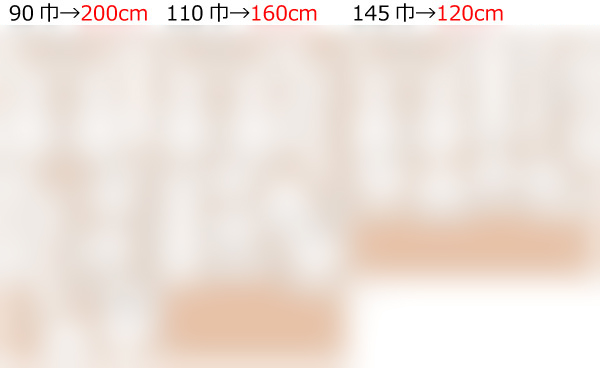
shoulder width15.7in bust35in waist27in hip35.2in length30.3in 22sheets of A4 size(or legal size)
Sleeve parts 42 size
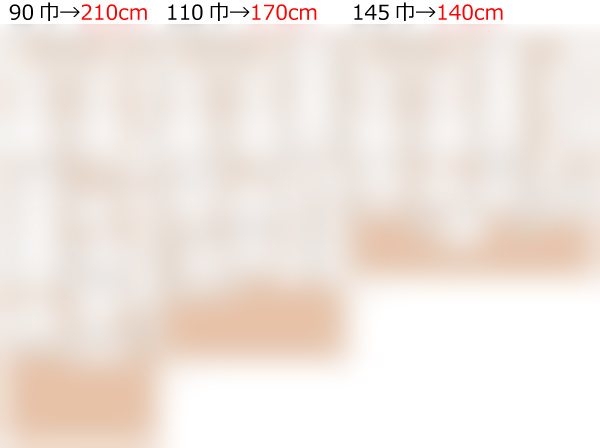
shoulder width16.9in bust37.8in waist29.3in hip38.2in length31.7in 22sheets of A4 size(or legal size)
Sleeve parts 45 size