


![]()
This is a free sewing pattern and tutorial for a sailor collar blouse.
This design appears very frequently in cosplay costumes and is considered a classic style. It can also be made as a sailor-style school uniform blouse. When sewn with lightweight fabric, it is suitable for everyday wear.
This pattern includes a front notch detail. Because of this structure, the blouse can be worn with a more fitted and slim silhouette.
Designs without this notch require extra ease for wearing, which results in a looser and wider fit. If you want a sharp and tailored look, a pattern with a notch is recommended.
This pattern uses a simplified construction compared to traditional sailor uniform sewing methods. For making an authentic sailor uniform, we recommend referring to a specialized sewing book.
The dart placement is designed carefully, allowing the blouse to have a clean and well-shaped line.
If you prefer a loose and relaxed blouse style, the waist darts can be omitted.
Child sizes (100 and 120) and men’s sizes are drafted without side darts and waist darts for ease of wear.
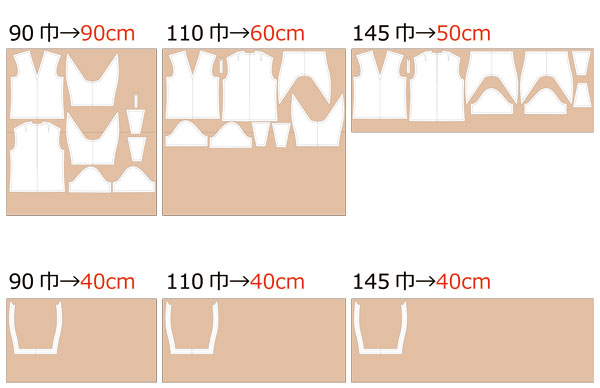
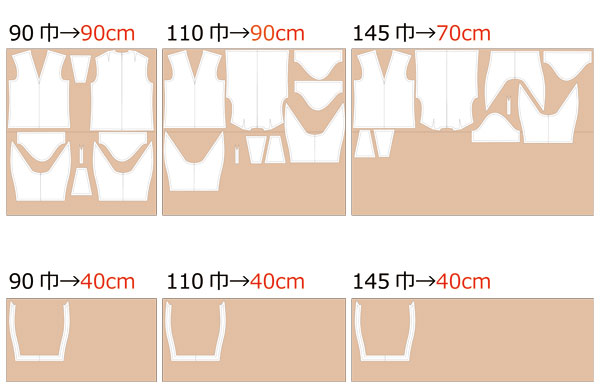
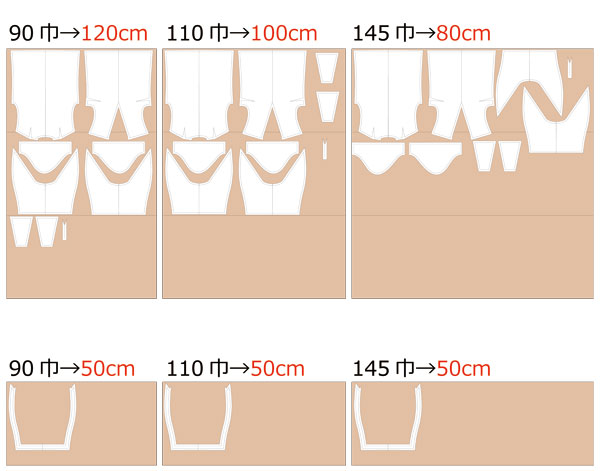
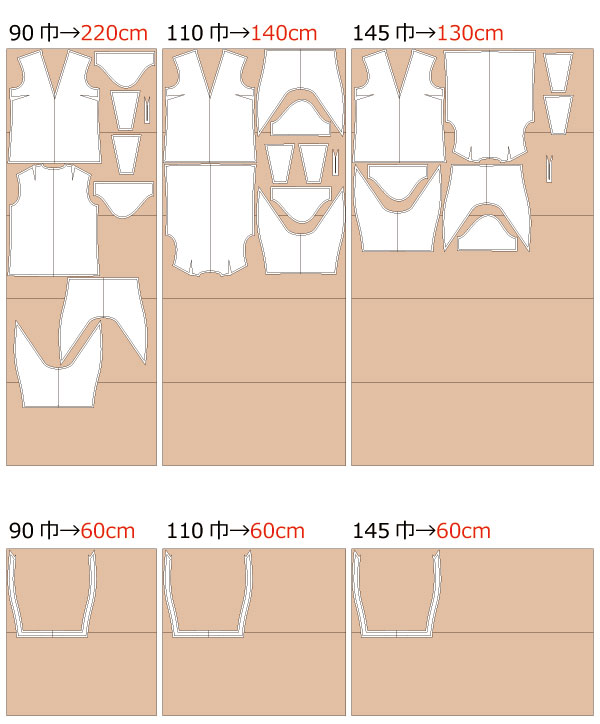
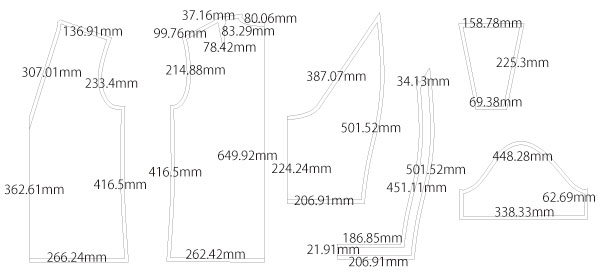
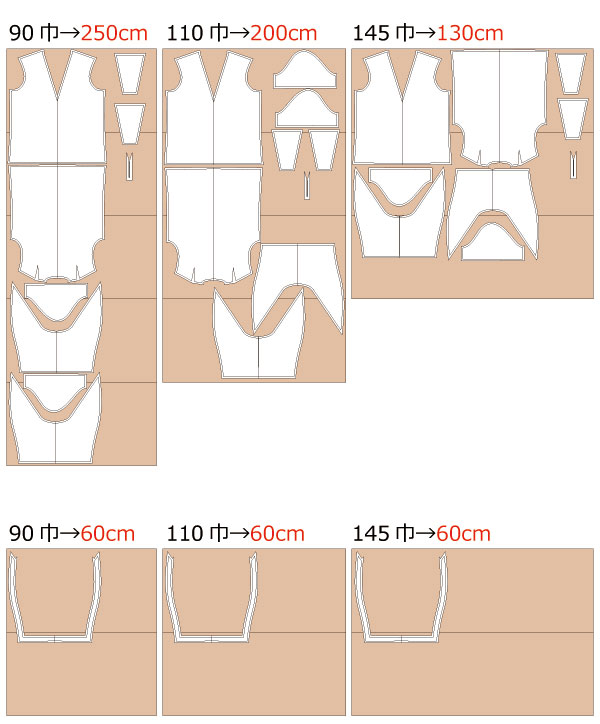
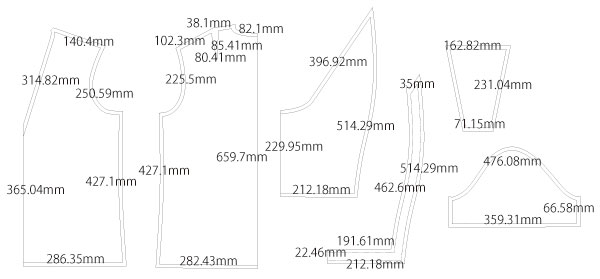
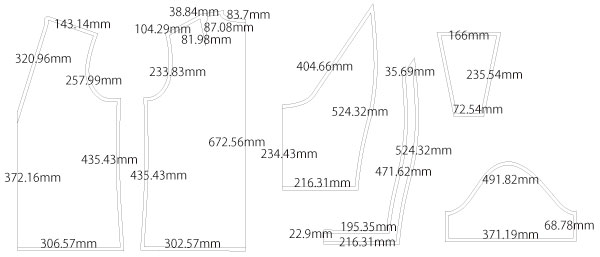
After printing, align the pages along the guide lines, paste them together, and cut out the pattern pieces. Seam allowances are included, so the pattern can be used as-is.


(1) Sew the darts on the front body and back body, then press the darts in the correct direction with an iron.
(2) Place the cutting cloth right sides together with the front body and sew it in place. Cut along the slit, turn the cutting cloth to the inside, and press with an iron.
*Finish the edges of the cutting cloth in advance.
*Adding topstitching to secure the slit is also recommended.
(3) First, press the inside of the collar line with an iron. Then sew the outer edge, turn it to the inside, and stitch it down.
(4) Sew the breastplate pieces together to form the breastplate, then attach the buttons. Attach the buttons to the body in advance as well.
*Snap buttons or regular buttons can be used.
(5) Finish the side edges of the front body, back body, and sleeves. Sew them together with a sewing machine, then press the seam allowances open with an iron.
(6) Finish the hems of the body and sleeves, fold them inward with an iron, and stitch them in place.
(7) Sew the collar pieces together, then attach the collar to the body.
*The collar can be attached by sandwiching it in, or by sewing one side first and securing it with topstitching.
(8) Sew the sleeves to the body and finish the seam allowances.
![]()
Free Paper Patterns are possible because of your support.
If you use our patterns, please share them on social media and tell your friends.
Your support helps DRCOS continue to provide patterns in the future.
![]()
![]()
Children's-100
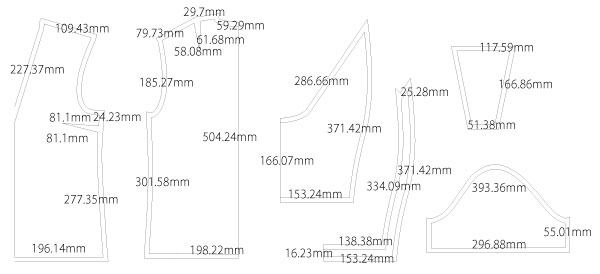
bust60.5cm waist59.5cm length39cm cuff23.5cm 6sheets of A4 size (or legal size)

Children's-4
bust23.8in waist23.4in length15.3in cuff9.2in 6sheets of letter size

Children's-120
bust70cm waist68.5cm length45cm cuff27cm 7sheets of A4 size (or legal size)

Children's-8
bust27.5in waist26.9in length17.7in cuff10.6in 8sheets of letter size
Children's-140
bust76cm waist69.5cm length50.5cm cuff29.5cm 11sheets of A4 size (or legal size)
Children's-10
bust29.9in waist27.3in length19.8in cuff11.6in 9sheets of letter size
Ladies'-S
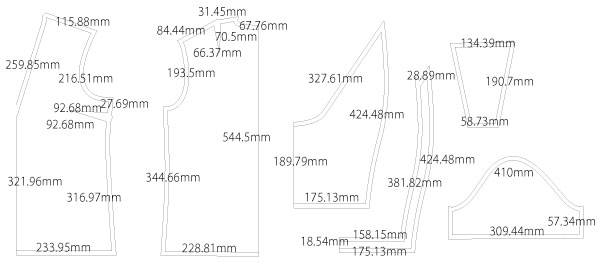
bust35in bust89cm waist81cm length54.5cm cuff31cm 11sheets of A4 size (or legal size)

Ladies'-S
bust35in waist31.8in length21.4in cuff12.2in 11sheets of letter size
Ladies'-M
bust96cm waist87cm length59cm cuff31.5cm 12sheets of A4 size (or legal size)

Ladies'-M
bust37.7in waist34.2in length23.2in cuff12.4in 12sheets of letter size
Ladies'-L
bust103cm waist93.5cm length63cm cuff34cm 14sheets of A4 size (or legal size)
Ladies'-L
bust40.5in waist36.8in length24.8in cuff13.3in 14sheets of letter size
Ladies'-LL
bust112.5cm waist110.5cm length64cm cuff37cm 16sheets of A4 size (or legal size)

Ladies'-LL
bust44.2in waist43.5in length25.1in cuff14.5in 15sheets of letter size
Men's-S
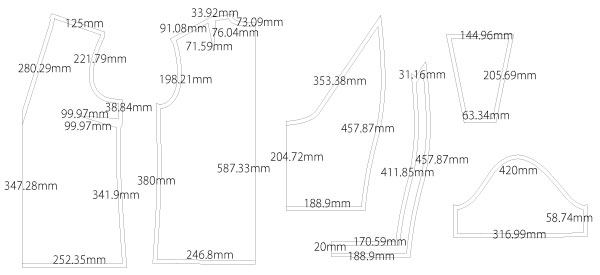
shoulder width43cm bust94cm waist93cm length64cm 12sheets of A4 size (or legal size)
Men's-S
bust37in waist36.6in length25.1in shoulder width16.9in 13sheets of letter size
Men's-M
shoulder width44cm bust102cm waist101cm length65cm 12sheets of A4 size (or legal size)

Men's-M
bust40.1in waist39.7in length25.5in shoulder width17.3in 14sheets of letter size
Men's-L
shoulder width45cm bust110cm waist109cm length66cm 15sheets of A4 size (or legal size)
Men's-L
bust43.3in waist42.9in length25.9in shoulder width17.7in 15sheets of letter size
Men's-LL
shoulder width46cm bust118cm waist117cm length67.5cm 15sheets of A4 size (or legal size)

Men's-LL
bust46.4in waist46in length26.5in shoulder width18.1in 16sheets of letter size


