


![]()
This is a sewing pattern for a fitted vest with a stand collar.
This pattern was created after receiving customer requests, as it had not been available before.
The design has a slim and clean silhouette that fits the body line.
If you prefer a more relaxed fit, please use one size larger pattern.
The sewing steps provided are the simplest method, so you can follow them easily.
If you want to make a more professional garment, you can adjust or change the sewing process as needed.
This pattern is made using a three-dimensional body line, so it creates a very clean and beautiful shape when worn.
It is suitable for cosplay costume making, stage outfits, and also everyday fashion wear.
This vest sewing pattern is a good base for creating original costumes or custom designs.
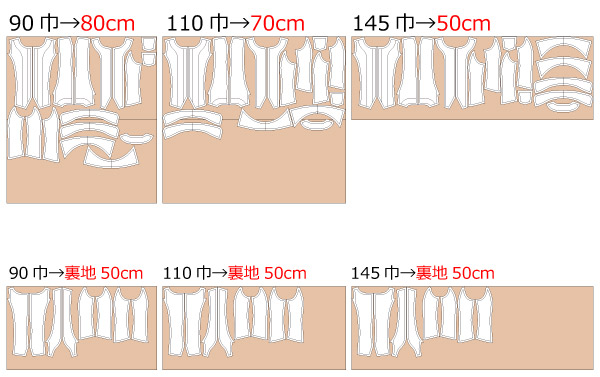
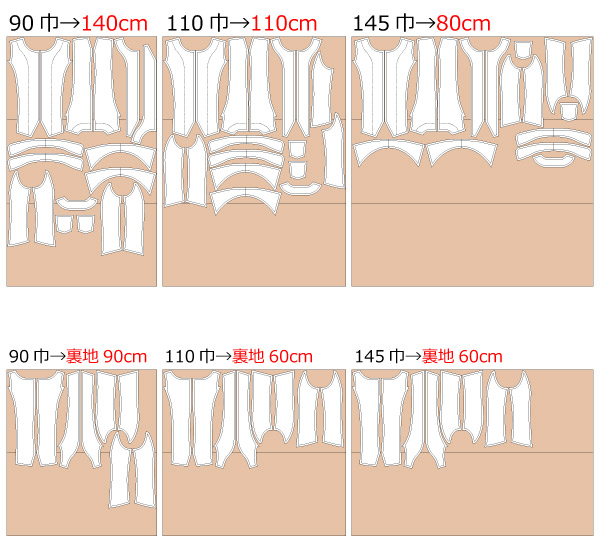
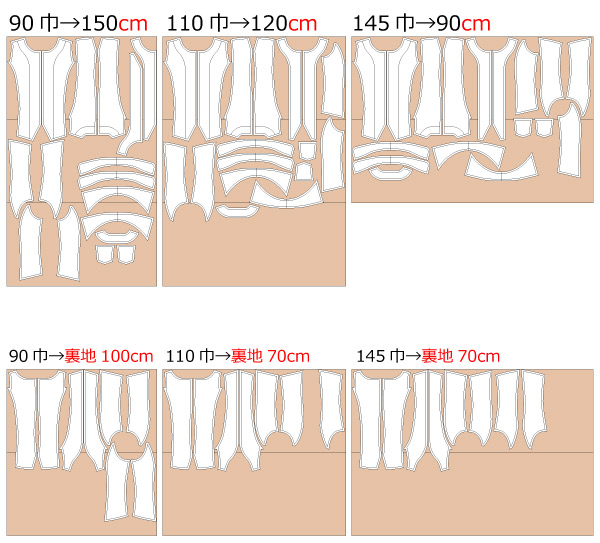
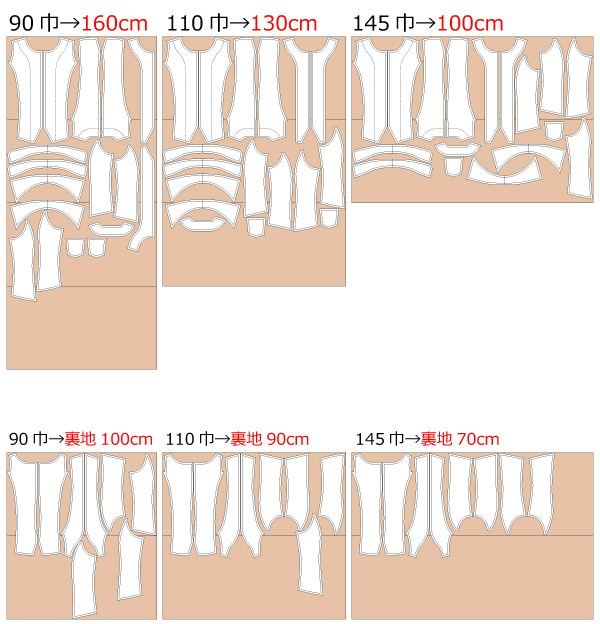
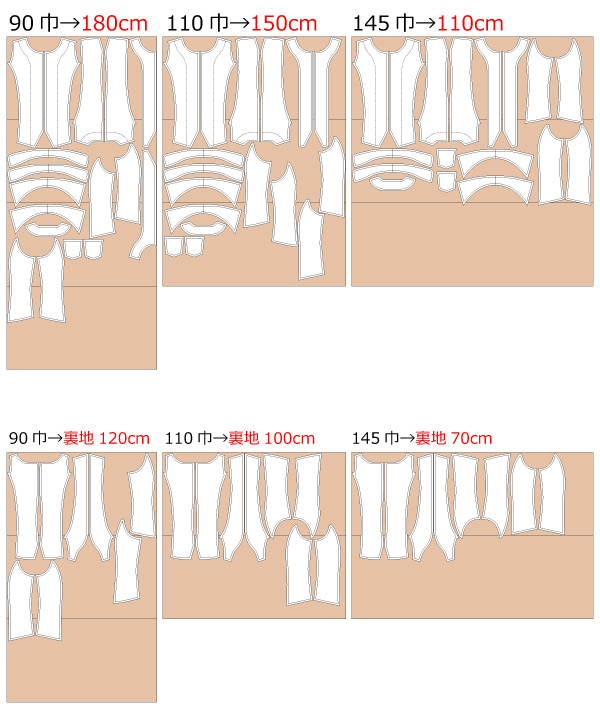
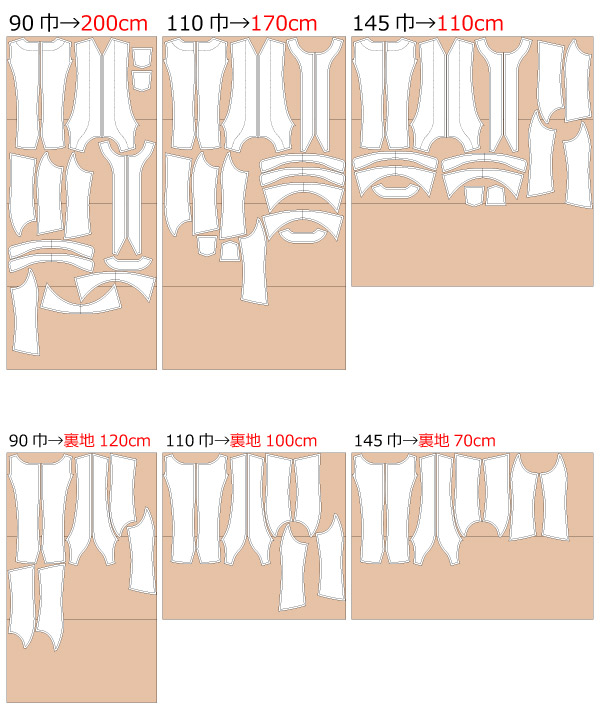
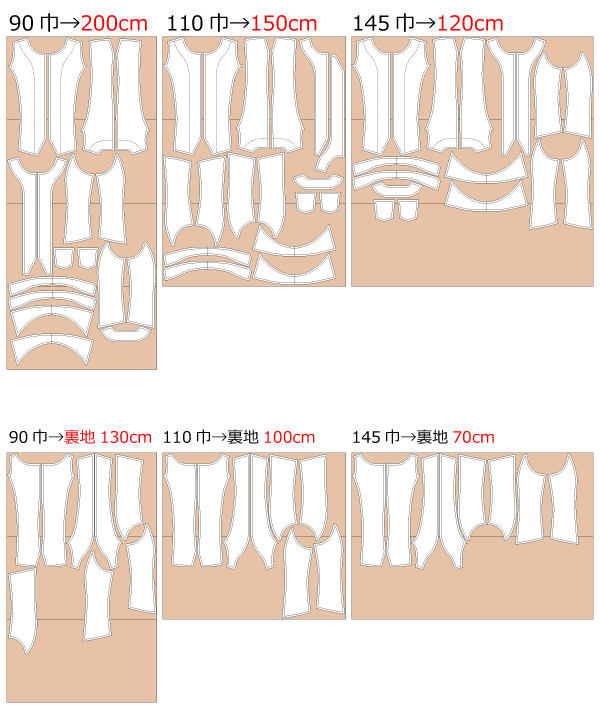
After printing, match the joining lines, tape the pages together, and cut out the pattern pieces before use.
The seam allowance is already included in the pattern, so you can use it as it is.
This fitted vest pattern is recommended for people looking for a stand collar vest sewing pattern, cosplay vest base, or a clean silhouette vest design.

* There are many ways to sew this garment, but this page shows a simple sewing method. If you can finish the armholes or lining in a more advanced way, please use your preferred method.
(1) Sew the front body to the front side body, and sew the back body to the back side body. Press the seam allowances open with an iron.
* Clip the seam allowance where the fabric pulls or becomes tight.
![]() How to finish seam edges (serging / overlock sewing machine)
How to finish seam edges (serging / overlock sewing machine)
(2) Attach the pockets.
(3) Apply fusible interfacing to the collar, stand collar, and facing.
(4) Sew the facing and lining together, and make the lining side shape as well, except for the collar area.
* Clip the seam allowance where the fabric pulls or becomes tight.
(5) Fold the armhole edges of the outer fabric and lining 1 cm to the inside with an iron to make the shape.
(6) Place the collar right sides together, sew it while leaving the stand collar part open, then turn it right side out and press with an iron.
* Before turning it right side out, trim the bulky corner areas.
(7) Place the stand collar right sides together, sandwich the collar at the collar position, sew it, then turn it right side out and hold it in place with topstitching.
* Start sewing the body side of the stand collar after leaving 1 cm of seam allowance open.
(8) Sew the facing to the body while sandwiching the stand collar in place.
* When sewing around the outer edge, leave one opening for turning on the front side that overlaps underneath when the front buttons are closed.
(9) Sew topstitching around the outer edge to keep the shape neat and stable.
(10) Close the armholes with topstitching.
(11) Make buttonholes at the buttonhole marks and attach the buttons at the button marks.
![]()
Free Paper Patterns are possible because of your support.
If you use our patterns, please share them on social media and tell your friends.
Your support helps DRCOS continue to provide patterns in the future.
![]()
![]()
Children's-100
shoulder width21.5cm bust60cm waist51.5cm length38.5cm 7sheets of A4 size (or legal size)

Children's-4
bust24.8in waist20.3in lenght15.2in 8sheets of letter size

Children's-120
shoulder width23cm bust67cm waist54cm length45cm 8sheets of A4 size (or legal size)

Children's-8
bust26.4in waist21.3in lenght17.7in 9sheets of letter size
Children's-140
shoulder width25.5cm bust76cm waist66cm length51.5cm 10sheets of A4 size (or legal size)

Children's-10
bust29.9in waist26in lenght20.3in 11sheets of letter size
Ladies'-S
shoulder width29cm bust85cm waist73cm length54.5cm 12sheets of A4 size (or legal size)
Ladies'-S
bust33.5in waist28.7in lenght21.5in 13sheets of letter size
Ladies'-M
shoulder width29.5cm bust94cm waist78cm length56.5cm 13sheets of A4 size (or legal size)
Ladies'-M
bust37in waist30.7in lenght22.2in 14sheets of letter size
Ladies'-L
shoulder width30.5cm bust100cm waist88cm length58.5cm 14sheets of A4 size (or legal size)
Ladies'-L
bust39.4in waist34.6in lenght23in 15sheets of letter size
Ladies'-LL
shoulder width31cm bust106cm waist89cm length61cm 15sheets of A4 size (or legal size)
Ladies'-LL
bust41.7in waist35in lenght24in 16sheets of letter size
Men's-L
shoulder width33.5cm bust110cm waist92cm length63cm 16sheets of A4 size (or legal size)
Men's-L
bust43.3in waist36.2in lenght24.8in 16sheets of letter size
Men's-LL
shoulder width34cm bust115cm waist96.5cm length65cm 17sheets of A4 size (or legal size)
Men's-LL
bust45.3in waist38in lenght25.6in 18sheets of letter size


