


![]()
Comments are made using translation software.
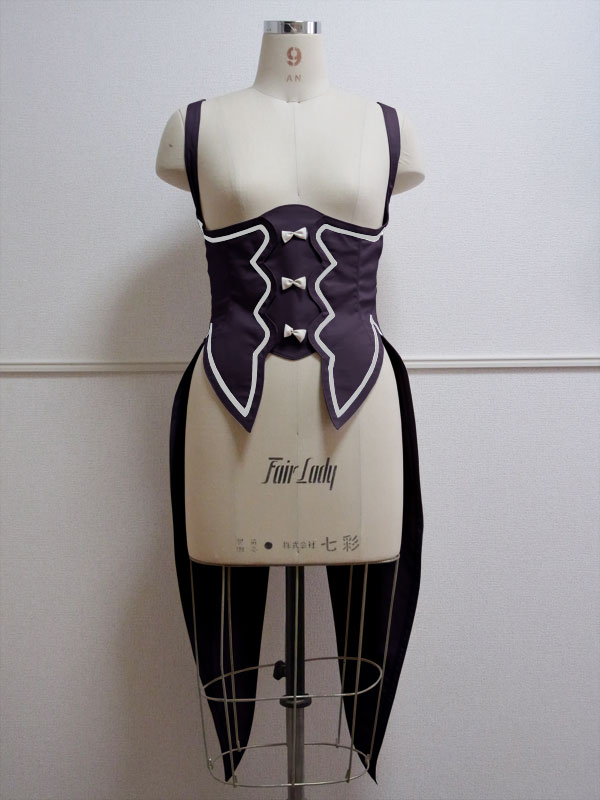
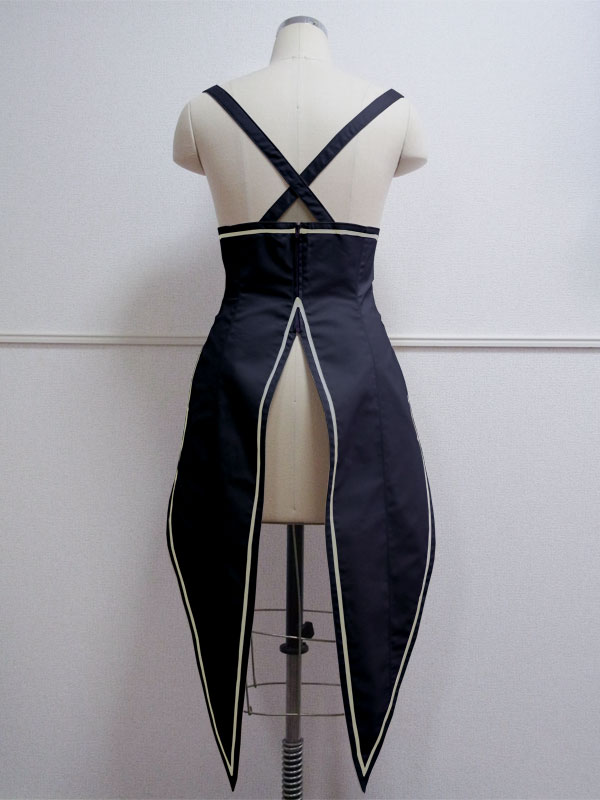
This is a pattern for a swallowtail corset, featuring a design with tails on the back, which has been heavily requested.
Creating a line that doesn't interfere with the skirt while still providing flare was quite challenging, and this pattern went through several redraws due to the difficulties.
Designs incorporating tails and waist wraps onto corset vests are commonly seen in cosplay costumes, making this pattern a recommended reference.
While it includes lining, it's recommended to use fabric with some stiffness to prevent distortion of the shape.
After printing, paste it according to the pasting line,Cut and use.
The pattern has a seam allowance, so it can be used as is.

I'm not so good at English.
So all explanations/instructions were translated using AI.
This is not always perfect and I apologise for any parts that are difficult to follow.
(1) Sew the “Front fabric” together, leaving a turning opening, then stitch around the edges to close the opening.
(2) Apply stay tape to the open zipper attachment position.
(3) Sew together “Front bodice” → “Front bodice side” → “Back bodice side” → “Back bodice” in order, then press the seam allowances open with an iron (symmetrical on both sides).
* Trim the taut areas of the seam allowance fabric before pressing it open.
(4) Assemble the lining by following the same process as (2), then press the seam allowances open with an iron (symmetrical on both sides).
(5) Place the “Bodice” and “Lining” right sides together and sew from “Starting point for sewing(1)” to “Ending point for sewing(1).”
(6) Sew from “Starting point for sewing(2)” to “Ending point for sewing(2),” leaving openings for inserting the shoulder straps (symmetrical on both sides).
(7) After sewing, trim any excess seam allowances, turn the fabric right side out, and press with an iron to shape.
(8) Fold the seam allowance of the shoulder strap openings to 1 cm (or 0.5 in) and press with an iron to prepare for easy stitching.
(9) Attach the open zipper to the zipper position.
(10) Stitch from “Starting point for sewing(1)” to “Ending point for sewing(2).”
(11) Stitch the open parts of the shoulder straps up to “Starting point for sewing(2).”
(12) Thread the shoulder straps through the shoulder strap loops, crossing them on both sides, then stitch from “Starting point for sewing(2)” to “Ending point for sewing(2).”
(13) Sew the bias tape to the designated bias position, ensuring the “Front fabric” is sewn together at the same time.
(14) Attach the ribbon to the ribbon attachment position on the “Front fabric.”
* Using store-bought ribbon is also recommended.
If you cannot see the SHOP due to 403 error
![]()
![]()
Children's 140 size
waist 59cm A4 paper size 9 sheets


Children's 10 size
waist 23.2in letter paper size 10 sheets

Ladies' S size
waist 63cm A4 paper size 10 sheets
Ladies' S size
waist 24.8in letter paper size 10 sheets
Ladies' M size
waist 69cm A4 paper size 11 sheets
Ladies' M size
waist 27.2in letter paper size 11 sheets
Ladies' L size
waist 75cm A4 paper size 11 sheets
Ladies' L size
waist 29.5in letter paper size 12 sheets
Ladies' LL size
waist 81cm A4 paper size 11 sheets
Ladies' LL size
waist 31.9in letter paper size 13 sheets
Men's L size
waist 89cm A4 paper size 12 sheets
Men's L size
waist 35in letter paper size 14 sheets
Men's LL size
waist 97cm A4 paper size 14 sheets
Men's LL size
waist 38.2in letter paper size 15 sheets


