


![]()
Comments are made using translation software.
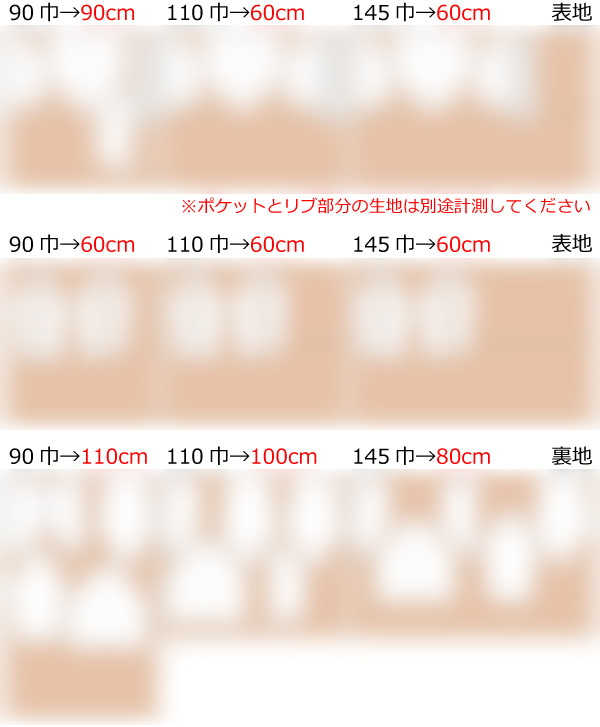
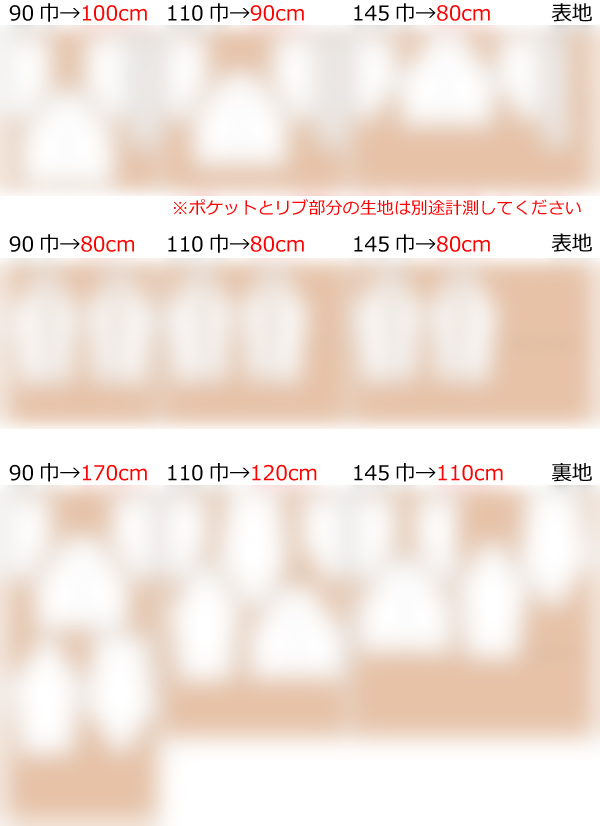
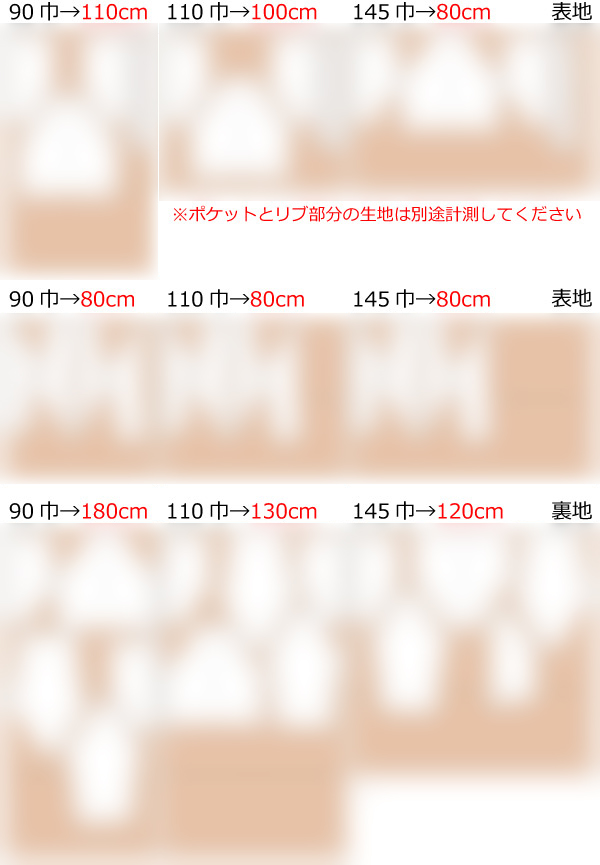
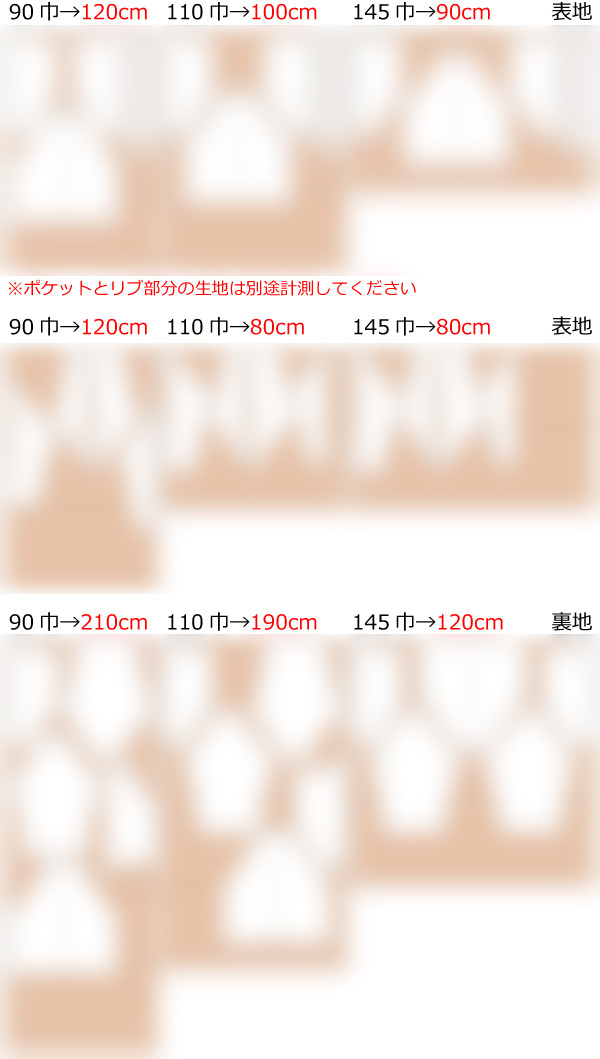
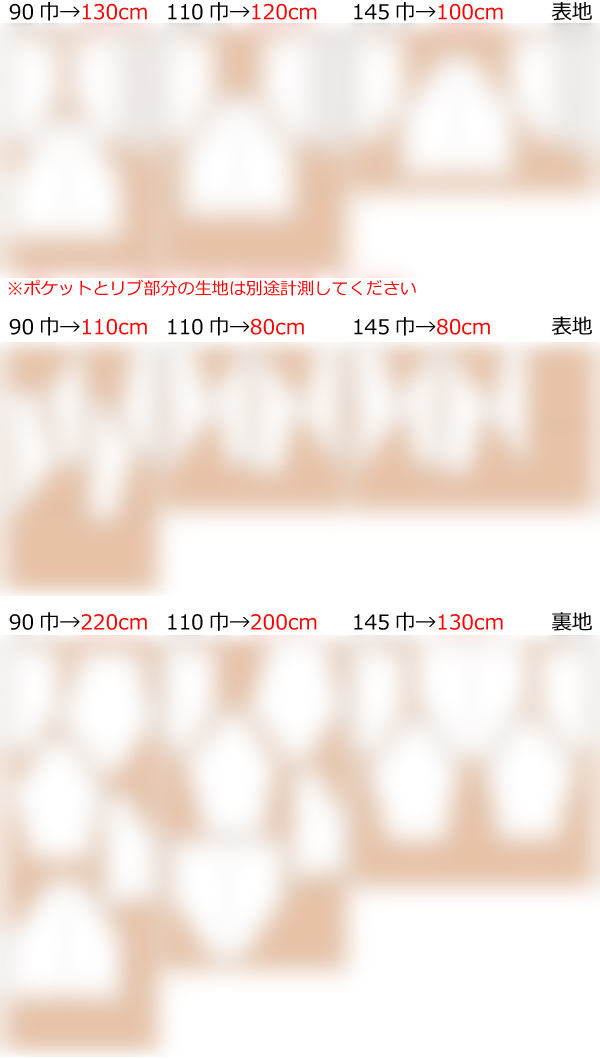
This is a pattern for a Sukajan (souvenir jacket).
Sukajan, which frequently appears in various characters, has been requested many times, so I've uploaded it despite some challenging aspects.
The lining is simplified to reduce the number of pieces, so there's no ease stitch added. Please adjust it yourself when adding ease stitch.
The pockets are piping pockets.
The ribbed hem section is made with more ease compared to a traditional Sukajan, making it easier to construct.
Feel free to use this as a base for cosplay costumes or for making your original Sukajan when going out.
The bust area is made with a relaxed fit.
After printing, paste it according to the pasting line,Cut and use.
The pattern has a seam allowance, so it can be used as is.

I'm not so good at English.
So all explanations/instructions were translated using AI.
This is not always perfect and I apologise for any parts that are difficult to follow.
(1) Create a Piping Pocket on the “Front bodice.”
* Since this design has a full lining, there is no need to serge/overlock around the Piping Pocket.
(2) Temporarily baste the pocket hem and the “bodice” hem together to prevent them from floating.
(3) After sewing the side seams of the “Front bodice” and “Back bodice,” press the seam allowances toward the back bodice.
(4) After sewing the “Sleeve part [A][B][C]” together, press the seam allowances toward the center of the sleeve.
(5) After sewing the side seam of the “Sleeve,” press the seam allowances to one side.
(6) Sew the armhole of the “bodice” and “Sleeve” together.
(7) Press the seam allowances of the bodice's armhole outward, then top stitch from the right side.
(8) After sewing the side seams of the “Front Lining” and “Back Lining,” press the seam allowances to one side.
(9) After sewing the side seam of the “Sleeve lining,” press the seam allowances to one side.
* Leave the opening on one side of the “Sleeve lining.”
(10) Sew the armhole of the “Lining.”
(11) Sew the “Section to Join the Hem” of the “bodice” and “Lining” together along the Sewing Line, then press the seam allowances open.
(12) With the “bodice” and “Lining” right sides facing, insert the “Hem rib” and sew them together.
(13) With the “bodice” and “Lining” right sides facing, insert the “Collar rib” and sew them together.
(14) With the “bodice” and “Lining” right sides facing, insert the zipper and sew them together.
* If using a metal zipper, adjusting the length at a craft store can be convenient.
(15) After sewing the side seam of the “Cuff rib” to create a loop, press the seam allowances open and fold the rib in half with an iron.
(16) With the “Sleeve” and “Sleeve lining” right sides facing, insert the “Cuff rib” and sew them together.
(17) Turn the garment right side out through the opening in the “Sleeve lining,” then sew the opening closed.
(18) Use top stitching to secure the “Cuff rib” at 5mm (0.2in) from the edge.
(19) Use top stitching to secure the “Hem rib” at 5mm (0.2in) from the edge.
If you cannot see the SHOP due to 403 error
![]()
![]()
Children's 140 size
bast 87.5 cm length 53 cm A4 paper size 18 sheets

Children's 10 size
bast 34.4 in length 20.9 in letter paper size 19 sheets

Ladies' S size
bast 100 cm length 58 cm A4 paper size 23 sheets

Ladies' S size
bast39.4in length22.8in letter paper size 25 sheets
Ladies' M size
bast 105.5 cm length 60.5 cm A4 paper size 24 sheets
Ladies' M size
bast41.5in length23.8in letter paper size 25 sheets
Ladies' L size
bast 110 cm length 64 cm A4 paper size 25 sheets
Ladies' L size
bast43.3in length25.2in letter paper size 28 sheets
Ladies' LL size
bast 116 cm length 67 cm A4 paper size 28 sheets

Ladies' LL size
bast45.7in length26.4in letter paper size 30 sheets
Men's L size
bast 120 cm length 71.5 cm A4 paper size 30 sheets
Men's L size
bast47.2in length28.1in letter paper size 31 sheets
Men's LL size
bast 125 cm length 76 cm A4 paper size 31 sheets
Men's LL size
bast49.2in length29.9in letter paper size 34 sheets


