


![]()
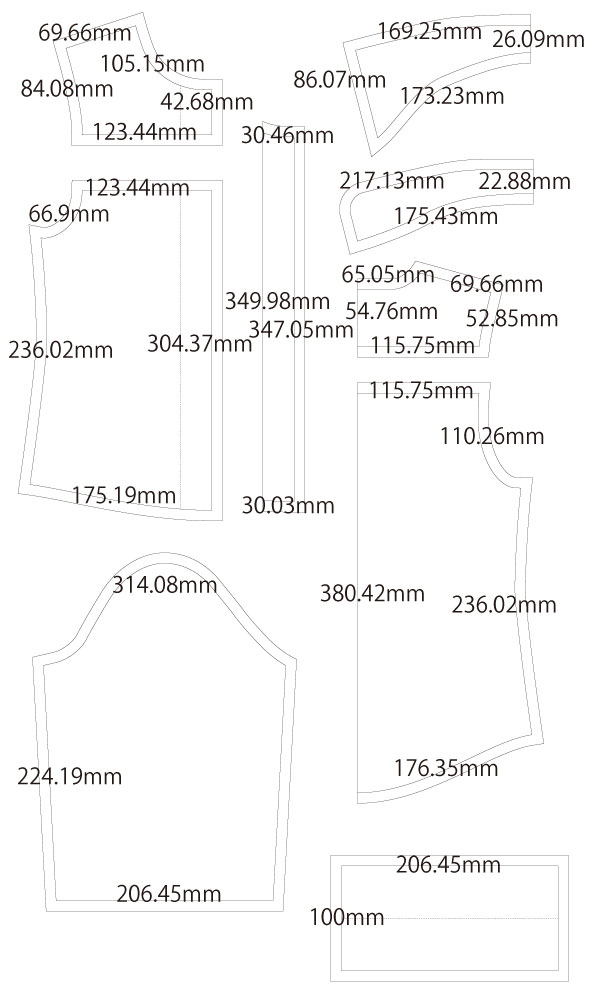
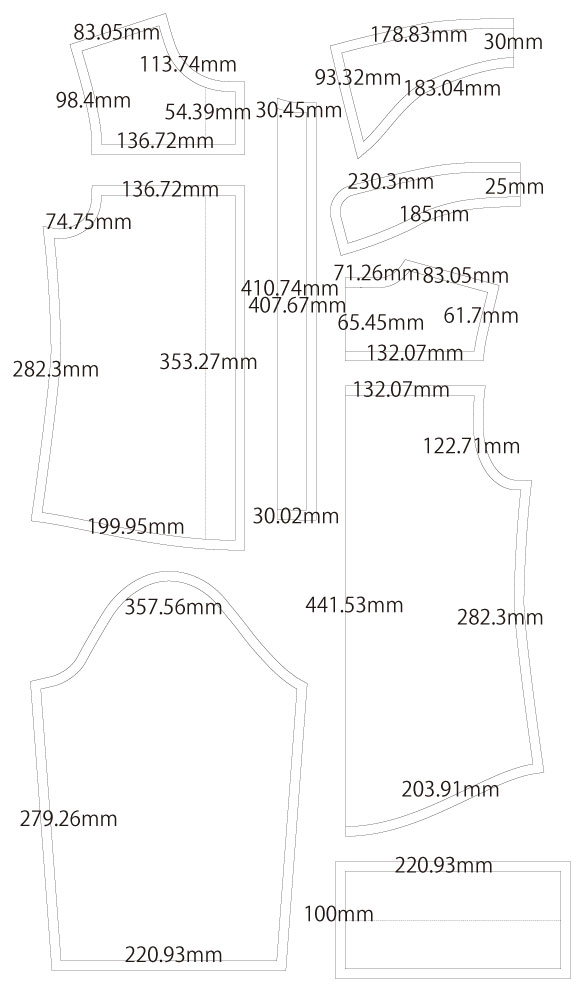
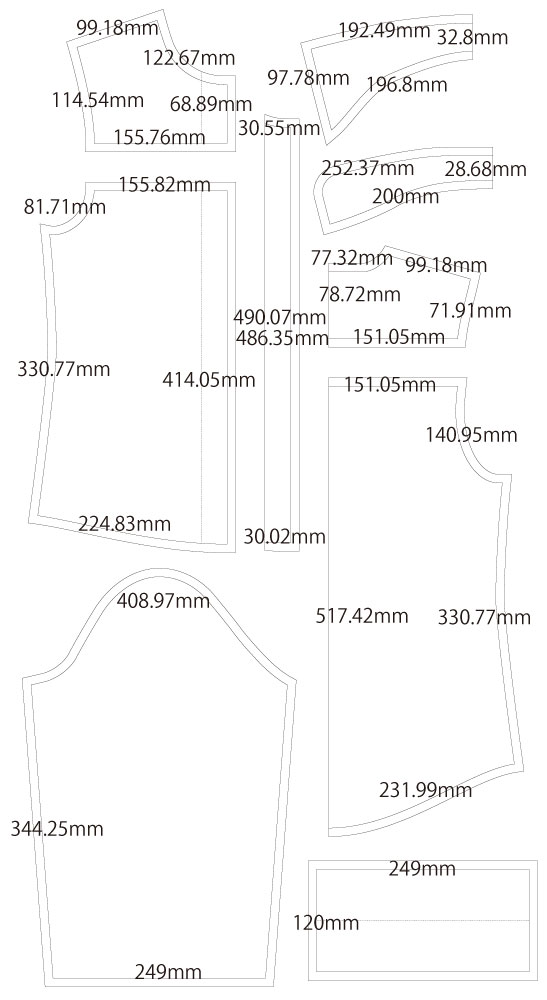
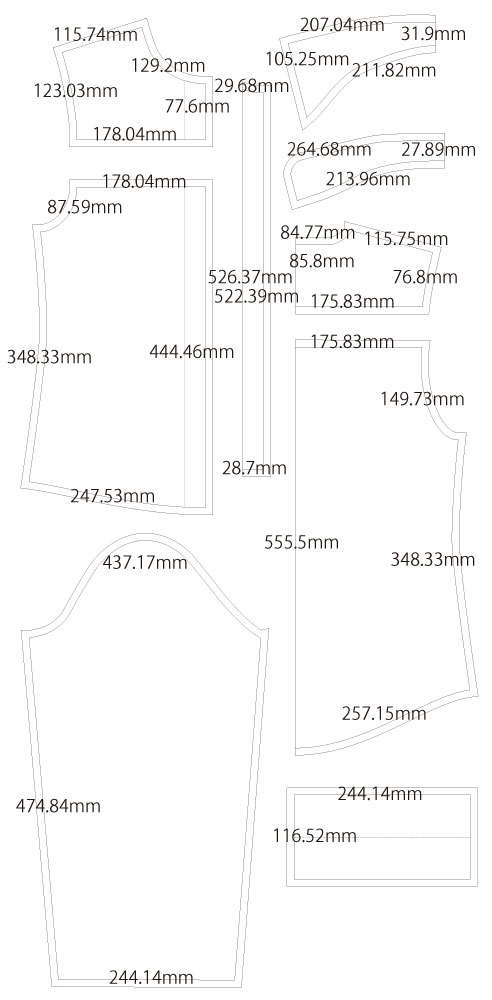
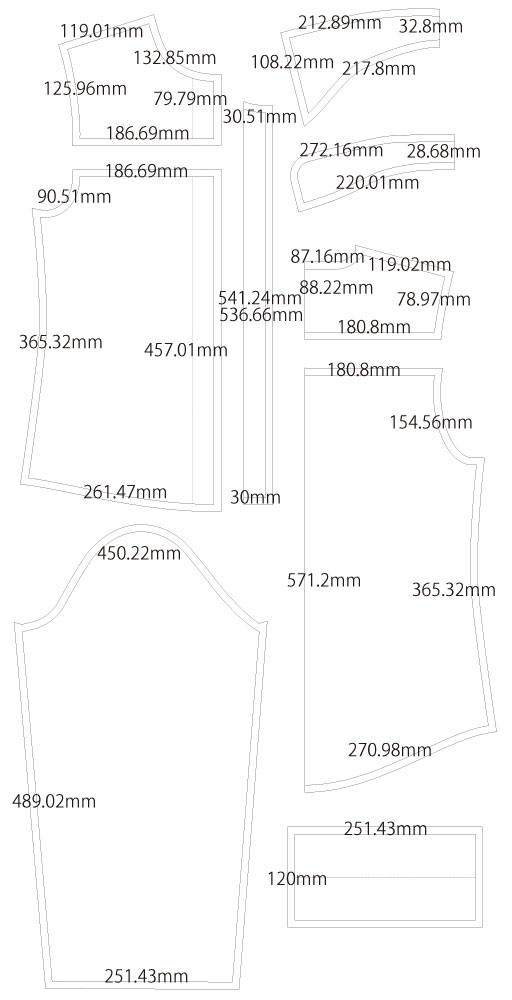
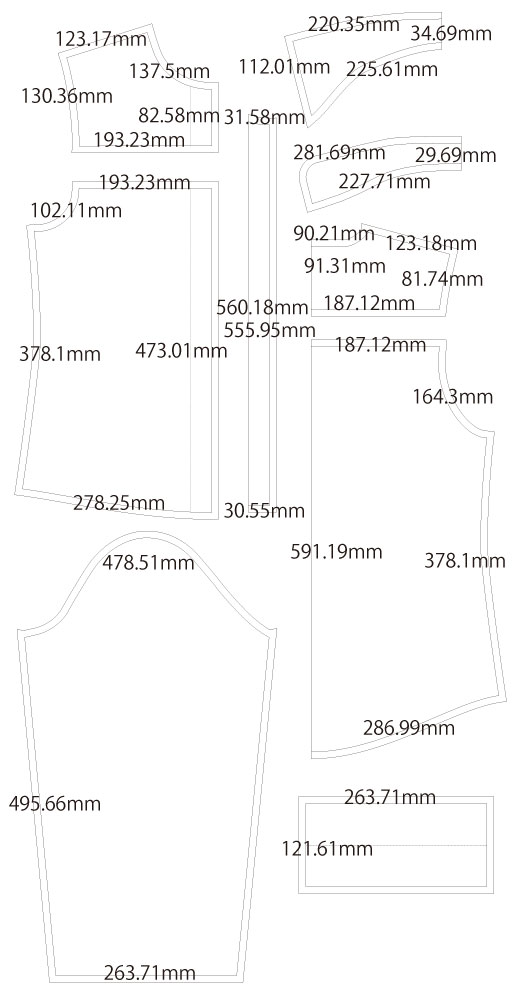
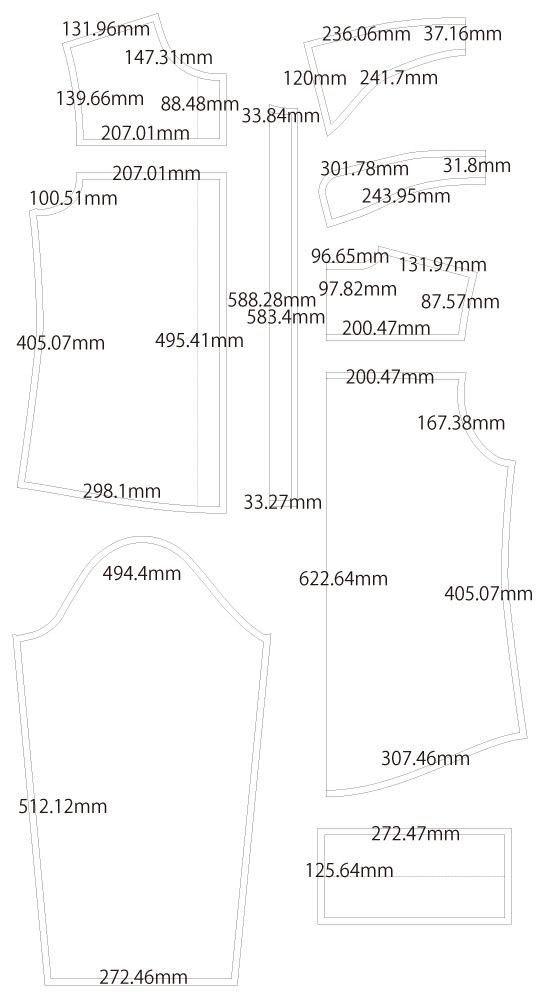
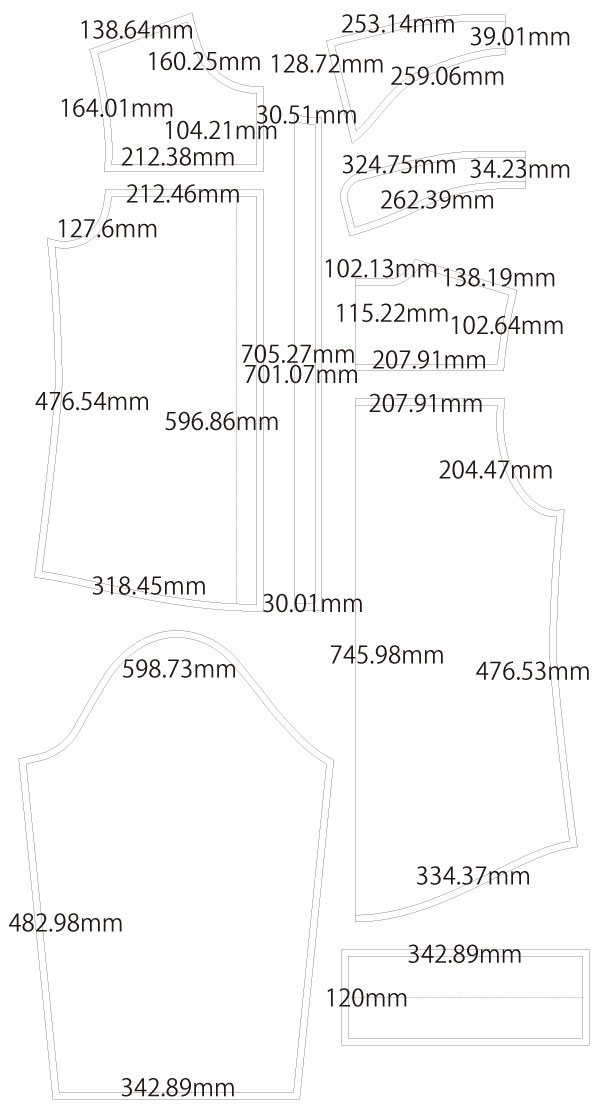
This is a free sewing pattern for a military-style shirt, a popular design frequently used in cosplay costumes and also suitable for stylish everyday wear. The pattern features a sharp, slightly angled collar, and both the front and back bodice are divided into upper and lower sections to create a clean, structured silhouette.
Seam allowances (S/A) are already included in the pattern, allowing you to use it immediately after printing and assembling the sheets. This sewing project is recommended for intermediate-level sewists, as it requires accurate stitching and careful handling of details.
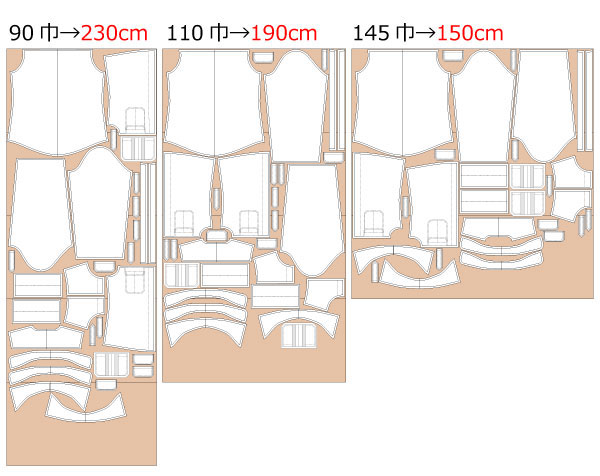
Suitable fabrics for this military shirt sewing pattern include cotton twill, poplin, and lightweight denim, which help achieve a crisp and professional finish. The finished garment works well as a cosplay outfit, themed uniform, or casual outerwear for daily wear or going out.
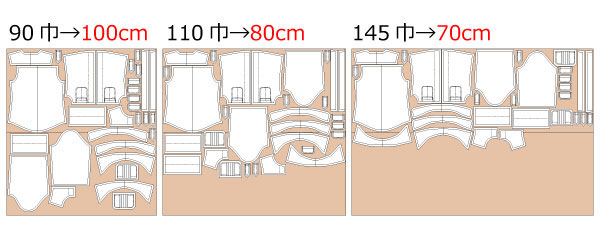
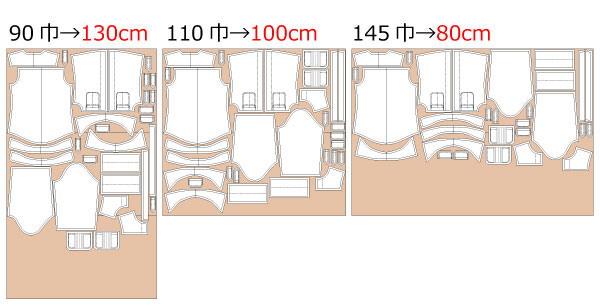
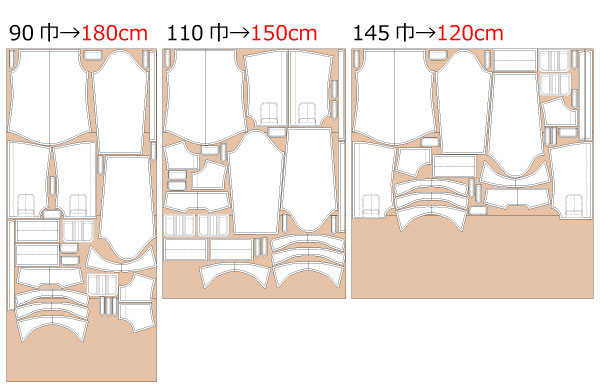
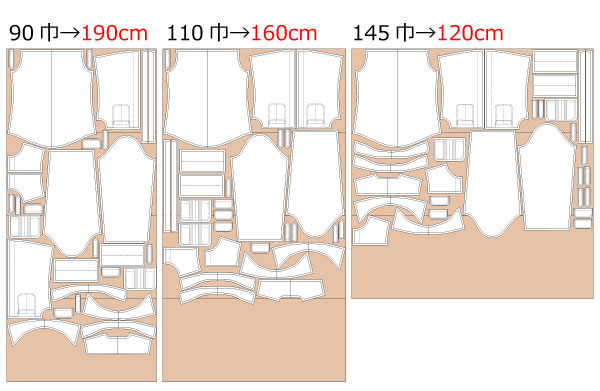
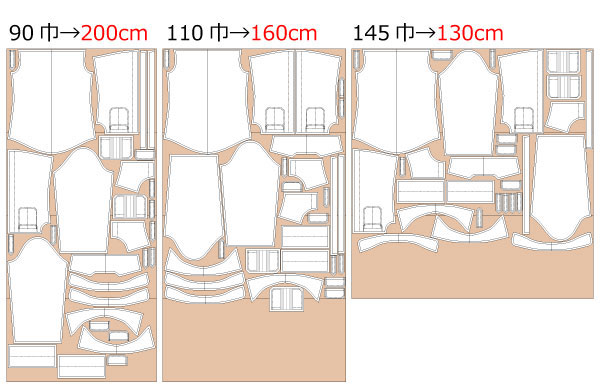
After printing, align the pages along the join lines, tape or glue them together, and cut out each pattern piece. No additional seam allowance is required, making this pattern easy to prepare and ready to sew.


(1) Prepare the "Flap", "Pocket", "Epaulette", and sleeve tabs in advance.
* Finish the buttonholes for the "Flap", "Epaulette", and sleeve tabs at this stage.
(2) Serge the shoulder and side seams of both the upper and lower sections of the front and back "Body".
![]() How to Serge / Finish seam allowances
How to Serge / Finish seam allowances
(3) Attach the "Pocket" to the front body. When joining the upper and lower sections of the front body, sandwich the "Flap" between them and serge the seam.
* After joining, press the seam allowance upward and secure it with topstitching.
(4) Sew the upper and lower sections of the back body together. Serge the seam allowance, press it downward, and secure with stitching.
(5) Sew the shoulders and side seams of the front and back body together.
(6) Apply fusible interlining to the "Collar", "Collar Stand", and "Facing".
(7) With right sides together, sew the "Collar" and "Collar Stand", leaving the collar stand opening. Turn right side out and press with an iron.
(8) Insert the "Collar" into the "Collar Stand", sew them together, turn right side out, and secure with topstitching.
* Start sewing with a 1cm seam allowance left open on the body side of the collar stand. Pre-pressing this fold with an iron will make the process easier.
(9) Finish the outer edge of the "Facing" with serging.
(10) Sew the "Facing" to the "Body".
(11) Insert the "Collar Stand" into the neckline of the "Body" and sew with a sewing machine.
(12) Attach the sleeve tabs ("Epaulette") to the "Sleeve".
(13) Serge the sleeve side seams, sew them together, and press the seam allowances open with an iron.
(14) Sew the side seams of the "Cuffs", fold the seam allowance inward by 1cm, and prepare them for attachment.
(15) Attach the "Cuffs" to the hem of the "Sleeve" by sandwiching and sewing.
(16) When attaching the "Sleeve" to the "Body", insert the "Epaulette" and sew together, then finish the seam allowance with serging.
(17) Serge the hem of the "Body", fold it up by 1cm, and sew with a sewing machine.
(18) Make buttonholes and sew on the buttons.
![]()
Free Paper Patterns are possible because of your support.
If you use our patterns, please share them on social media and tell your friends.
Your support helps DRCOS continue to provide patterns in the future.
![]()
![]()
Children's-100
shoulder width26cm bust60.5cm waist58.5cm length43.5cm 7sheets of A4 size (or legal size)

Children's-4
bust23.8in waist23in length17.1in shoulder width10.2in 8sheets of letter size

Children's-120
shoulder width30cm bust70cm waist67cm length50.5cm 9sheets of A4 size (or legal size)
Children's-8
bust27.6in waist26.4in length19.9in shoulder width11.8in 10sheets of letter size
Children's-140
shoulder width34cm bust79.5cm waist76cm length59.5cm 11sheets of A4 size (or legal size)

Children's-10
bust31.3in waist29.9in length23.4in shoulder width13.4in 12sheets of letter size
Ladies'-S
shoulder width39cm bust88cm waist85cm length68cm 14sheets of A4 size (or legal size)
Ladies'-S
bust34.6in waist33.5in length26.8in shoulder width15.3in 15sheets of letter size
Ladies'-M
shoulder width40cm bust93cm waist89.5cm length69cm 15sheets of A4 size (or legal size)
Ladies'-M
bust36.6in waist35.2in length27.2in shoulder width15.7in 16sheets of letter size
Ladies'-L
shoulder width41cm bust100cm waist96cm length70cm 16sheets of A4 size (or legal size)

Ladies'-L
bust39.4in waist37.8in length27.6in shoulder width16.1in 16sheets of letter size
Ladies'-LL
shoulder width44cm bust107cm waist103cm length72cm 18sheets of A4 size (or legal size)
Ladies'-LL
bust42.1in waist40.6in length28.3in shoulder width17.3in 18sheets of letter size
Men's-S
shoulder width43cm bust92cm waist88cm length70cm 16sheets of A4 size (or legal size)
Men's-S
bust36.2in waist34.6in length27.6in shoulder width16.9in 17sheets of letter size
Men's-M
shoulder width44cm bust100cm waist96cm length75.5cm 17sheets of A4 size (or legal size)

Men's-M
bust39.4in waist37.8in length29.7in shoulder width17.3in 18sheets of letter size
Men's-L
shoulder width45cm bust109cm waist105cm length81cm 19sheets of A4 size (or legal size)

Men's-L
bust42.9in waist41.3in length31.9in shoulder width17.7in 20sheets of letter size
Men's-LL
shoulder width46cm bust115cm waist111cm length86cm 21sheets of A4 size (or legal size)

Men's-LL
bust45.3in waist43.7in length33.9in shoulder width18.1in 22sheets of letter size


