


![]()
This is a free sewing pattern for a simplified maid outfit, designed for school festivals, cultural events, cosplay, and themed parties. In Japan, maid cafés are a popular attraction at school cultural festivals, and this costume is perfect for students or event participants who want to create an authentic look with easier construction.
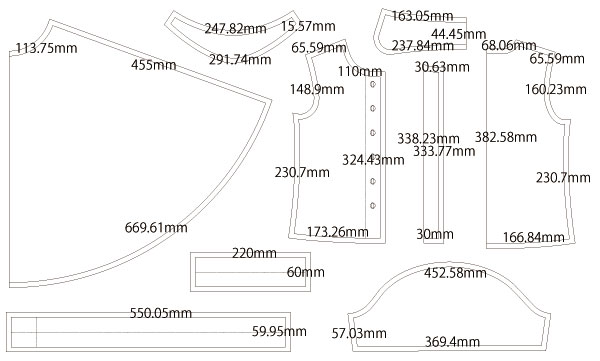
Although simplified, the design still requires basic sewing skills such as making buttonholes and installing zippers. The paper pattern includes seam allowances (S/A) and can be used as is.
The base style features a shawl collar with puff sleeves, which can be customized by adding gathered frills. The apron and oversized bow attach with hook-and-loop (Velcro) fasteners, making them easy to put on and take off.
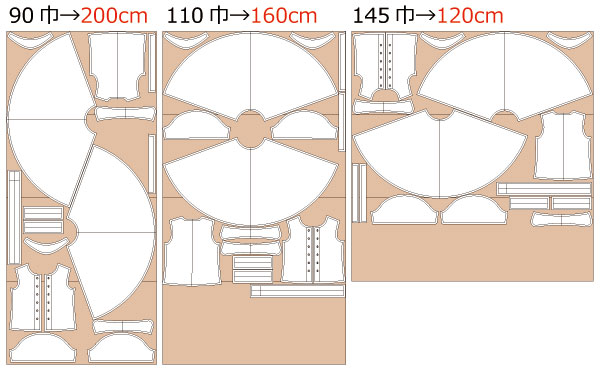
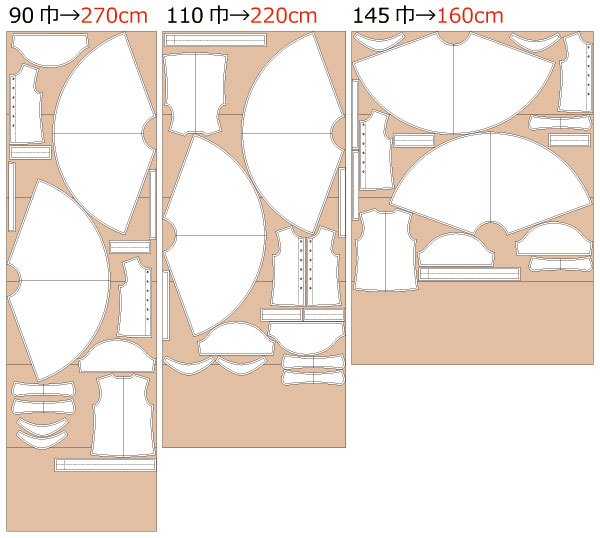
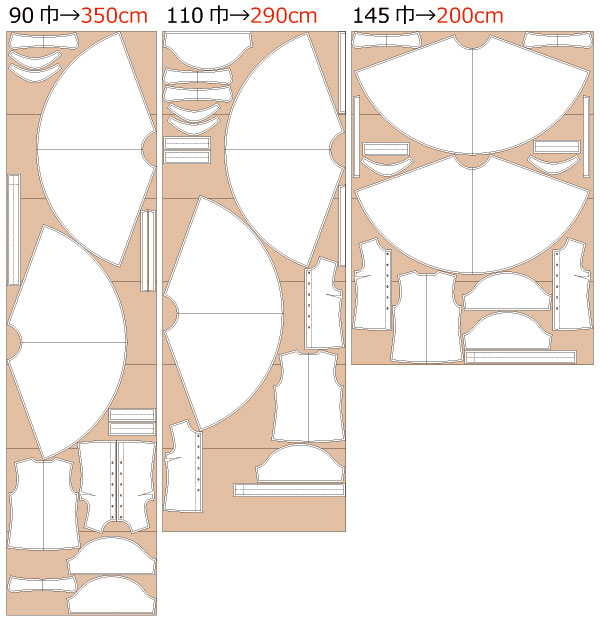
For the best silhouette, wear a petticoat (pannier) under the skirt. The skirt length is slightly longer so you can trim the pattern to your desired size.
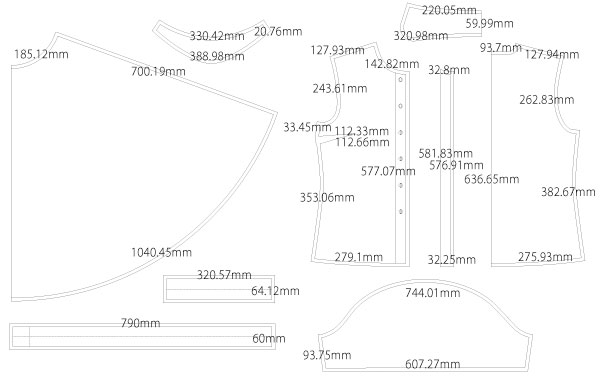
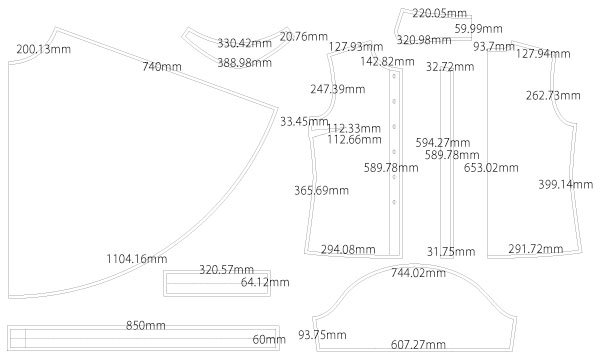
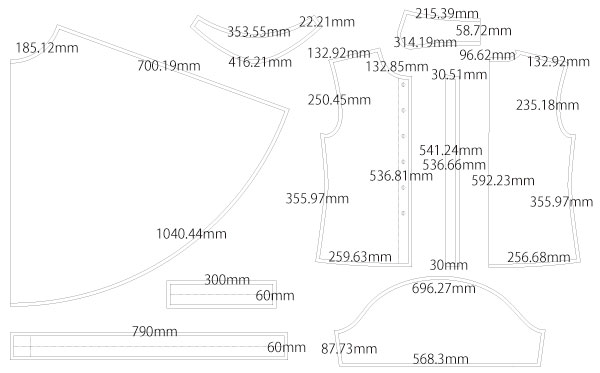
This pattern set includes the headdress, blouse, skirt, apron, and oversized bow. The apron and bow patterns are also available separately if needed.
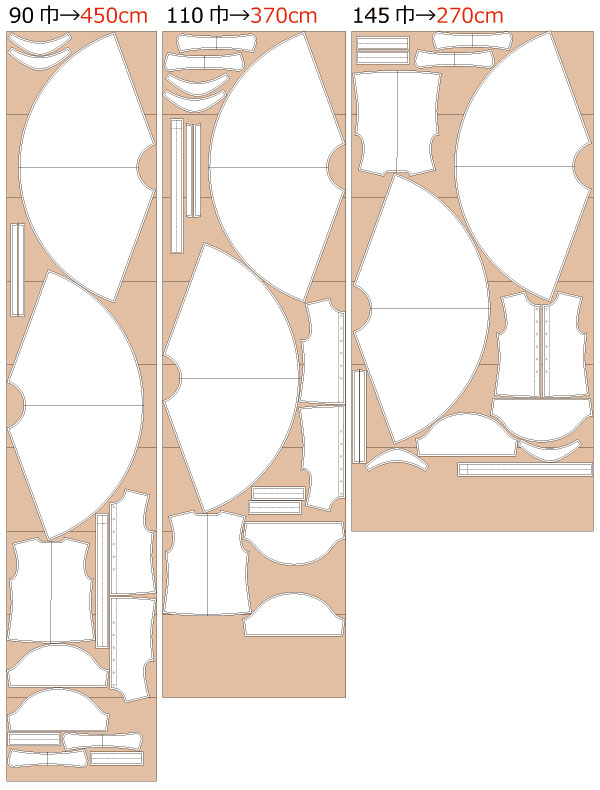
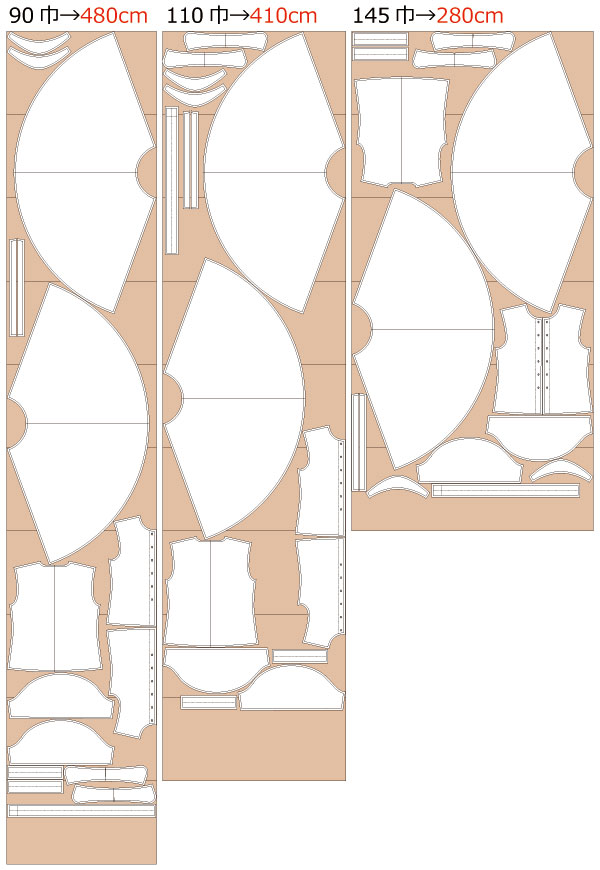
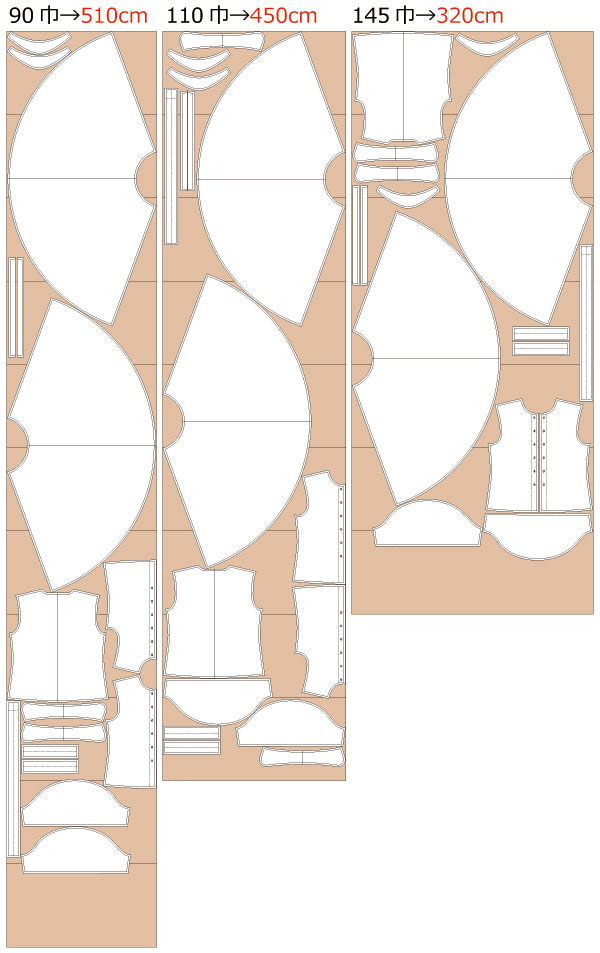
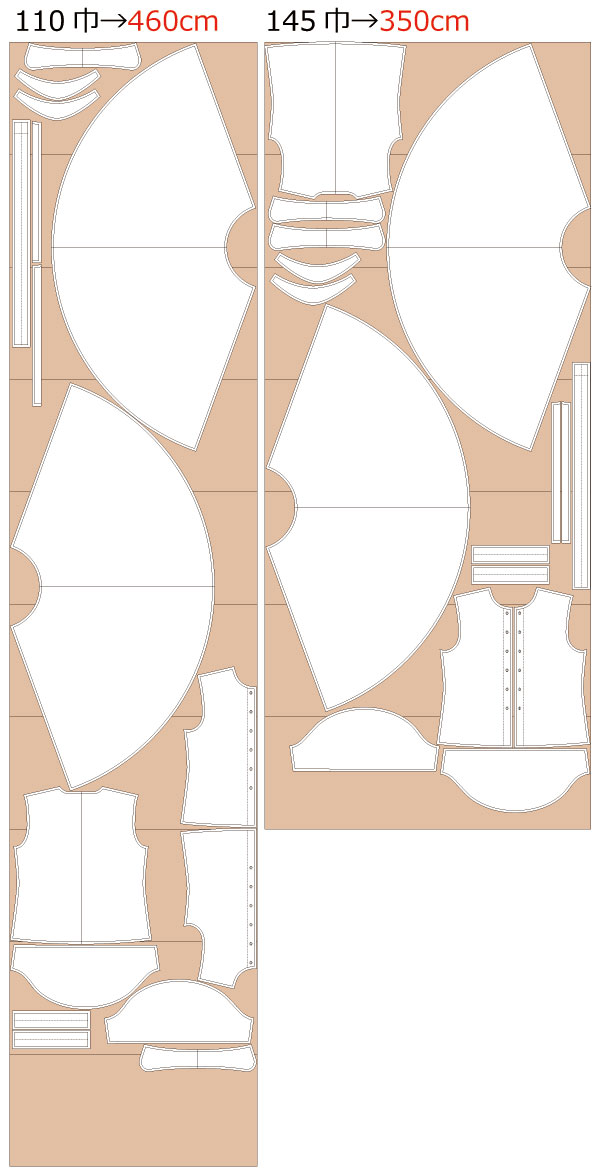
Before printing, check the total number of pages as this is a large pattern set. After printing, align the sheets along the join lines, tape or glue them together, and cut out the pieces. Seam allowances are already included, making it beginner-friendly.


The production process is explained with translation software.
If you have any suggestions on how to write like this, please let us know at info@dr-cos.com
We operate this site with your cooperation.
Blouse production process
What is "Grainline""cut on fold"? Please refer to this page
(1) Sew the "Front bodice" darts and iron down the seam allowance.
What is "Grainline""cut on fold"? Please refer to this page
(2) Serge/overlock the shoulders and sides of "Front bodice" and "Back bodice", sew them together, and press seam allowances open with an iron.
How to Serge/overlock (sewing machine & overlock sewing machine). Please refer to this page
(3) Apply fusible interlining to "Collar" and "facing".
(4) Sew "collar" together, turn inside out, and iron to shape.
How to make collar. Please refer to this page
* If you want to insert ruffles, insert them at this time.
(5) Serge/overlock the outside of "facing".
(6) Insert "collar" between "facing" and "body" and sew them together.
How to sew Facing and Hem. Please refer to this page
* At this time, it is better to hide the seam allowance by inserting bias tape as well.
(7) Serge/overlock the sides of the "Sleeve", sew them together, and press seam allowances open with an iron.
How to sew sleeves and sleeve cuffs. Please refer to this page
(8) Gather the "Sleeve" around the armhole and the "Cuff", and sew the "Cuff".
(9) After sewing the "Sleeve" to the "Body", Serge/overlock the armholes.
(10) Serge/overlock the hem of "Body", fold up 0.5 inch (≈1cm), and sew with a sewing machine.
(11) Make buttonholes and sew on buttons.
How to sew on buttons. Please refer to this page
How to make buttonholes. Please refer to this page
Skirt production process
(1) After Serge/overlocking the sides of "Bodice", sew them together and press seam allowances open with an iron.
(2) Stick the stay tape on the zipper part.
How to use stay tape. Please refer to this page
(3) Sew the invisible zip.
(4) Serge/overlock the hem of the skirt, and iron 0.5 inch (≈1cm).
(5) Sew the ruffles to the hem while sewing them in place with a sewing machine.
(6) Sew a "waist band" to the skirt.
Preparation of belt section. Please refer to this page
How to Sew on snap. Please refer to this page
How to sew the hook. Please refer to this page
How to sew a hook "bar eye" version. Please refer to this page
Apron production process
(1) Attach "pocket" to the pocket position of "Apron".
How to sew pockets. Please refer to this page.
(2) After inserting the gathered ruffles between the "apron" and "lining", sew around the perimeter except for the top portion.
(3) Turn the garment inside out and sew around the perimeter using the topstitch.
(4) Attach the fusible interlining to the "apron waist band" and pre-shape it with an iron so that it can be tucked in.
(5) Align the "Apron" with the center match mark on the "Apron waist band", insert the "Apron" and sew.
(6) Attach the Velcro tape.
headdress production process
(1) Attach fusible interlining to one piece of "Headdress", insert the gathered lace between the fusible interlining and sew it together.
(2) Sew the cord inside, iron in 0.5 inch (≈1cm), and sew closed with a sewing machine.
![]()
Free Paper Patterns are possible because of your support.
If you use our patterns, please share them on social media and tell your friends.
Your support helps DRCOS continue to provide patterns in the future.
![]()
![]()
Children's-100
blouse bust61cm waist60cm length45.5cm 22sheets of A4 size (or legal size)

Children's-4
blouse bust24in waist23.6in skirt waist19.7in length17.9in 21sheets of letter size

Children's-120
blouse bust67cm waist65cm length52.5cm 26sheets of A4 size (or legal size)

Children's-8
blouse bust26.4in waist25.6in skirt waist21.3in length20.7in 26sheets of letter size
Children's-140
blouse bust77cm waist73.5cm length58cm 33sheets of A4 size (or legal size)
Children's-10
blouse bust30.3in waist28.9in skirt waist24.4in length22.8in 33sheets of letter size
Ladies'-S
blouse bust86.5cm waist83cm length68cm 39sheets of A4 size (or legal size)

Ladies'-S
blouse bust34in waist32.7in skirt waist24.4in length26.8in 40sheets of letter size
Ladies'-M
blouse bust94cm waist90cm length70cm 41sheets of A4 size (or legal size)

Ladies'-M
blouse bust37in waist35.4in skirt waist26.7in length27.5in 42sheets of letter size
Ladies'-L
blouse bust101cm waist96.5cm length70cm 45sheets of A4 size (or legal size)
Ladies'-L
blouse bust39.7in waist37.9in skirt waist29.1in length27.5in 43sheets of letter size
Ladies'-LL
blouse bust107cm waist102.5cm length74cm 45sheets of A4 size (or legal size)

Ladies'-LL
blouse bust42.5in waist40.3in skirt waist31.4in length29.1in 45sheets of letter size
Men's-S
blouse bust94cm waist90cm shoulder width44cm length70cm 45sheets of A4 size (or legal size)
Men's-S
blouse bust37in waist35.4in shoulder width17.3in skirt waist29.1in length27.5in 45sheets of letter size
Men's-M
blouse bust102cm shoulder width47.5cm waist97cm length72cm 48sheets of A4 size (or legal size)
Men's-M
blouse bust40.1in waist38.1in shoulder width18.7in skirt waist32.2in length28.3in 48sheets of letter size
Men's-L
blouse bust109cm shoulder width48.5cm waist104cm length75cm 47sheets of A4 size (or legal size)

Men's-L
blouse bust42.9in waist40.9in shoulder width19.1in skirt waist34.2in length29.5in 49sheets of letter size
Men's-LL
blouse bust115cm shoulder width49cm waist110cm length76cm 50sheets of A4 size (or legal size)

Men's-LL
blouse bust45.3in waist43.3in shoulder width19.3in skirt waist37in length29.9in 51sheets of letter size


