


![]()
Comments are made using translation software.
Due to its considerably high level of difficulty, I believe it will be quite challenging to make unless you have some sewing experience.
However, if you're looking to modify it for use as a base for costumes with open chest areas, then I recommend it.
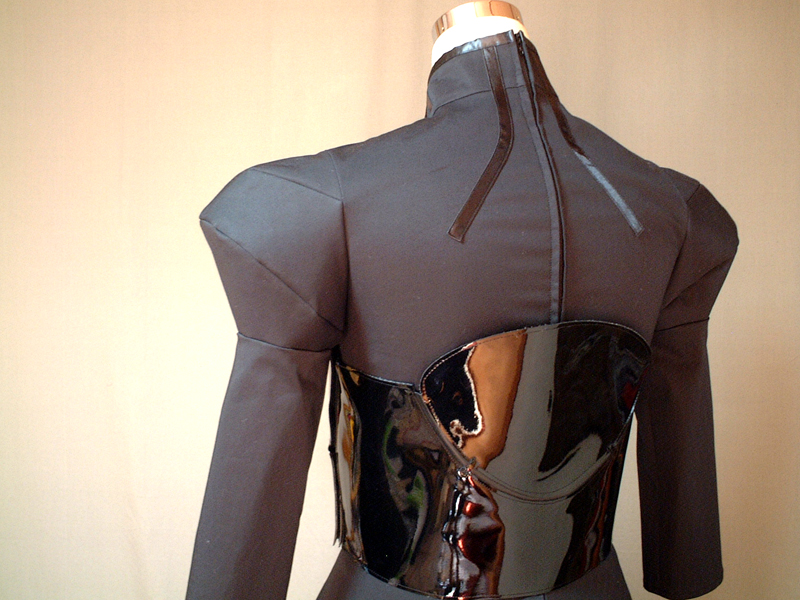
As you can see from the pattern, the shape is quite unique.
With its three-dimensional sleeve design, it could be useful for cosplay costumes.
After printing, paste it according to the pasting line,Cut and use.
The pattern has a seam allowance, so it can be used as is.


I'm not so good at English.
So all explanations/instructions were translated using AI.
This is not always perfect and I apologise for any parts that are difficult to follow.
* For fabrics with the thickness of regular twill, using the same thickness of fabric on the back of the "Body" helps stabilize the shape and gives a cleaner finish. In the pattern, this involves using the same fabric as lining during the construction process.
(1) Apply fusible interlining to the neckline, and cotton fusible interlining to the upper and middle parts of the "Sleeve," then iron them in place.
(2) Sew the darts at the upper part of the "Sleeve," fold the seam allowance (S/A) downwards, and iron towards the center.
* It's recommended to secure the seam allowance (S/A) of the darts with topstitching for a cleaner shape.
(3) Serge/overlock around the armhole of the "Body" only, as well as the upper and middle parts of the "Sleeve."
![]() How to Serge/overlock (sewing machine & overlock sewing machine)
How to Serge/overlock (sewing machine & overlock sewing machine)
(4) Sew the stitching lines of the two chest fabrics together, then flip them over and iron to shape.
* Make incisions at the cutting positions when flipping over.
(5) Baste the temporary sewing positions of the chest fabric.
(6) Make incisions at the cutting positions on the front fabric and fold along the fold lines with an iron.
(7) Stitch the two front fabrics together while sandwiching the chest fabric with topstitching, then baste the front fabric.
(8) Sew together the "Back bodice" and "Back bodice side," pressing open the seam allowance (S/A) with an iron (also for the right side lining).
* Make incisions at the hanging part of the seam allowance (S/A) to stabilize it.
* For a clean line, apply topstitching to the opened seam allowance (S/A).
(9) Sew the shoulders of the "Front bodice" and "Back bodice" together, pressing open the seam allowance (S/A) with an iron (also for the right side lining).
(10) Sew the neck onto the "Body," pressing open the seam allowance (S/A) with an iron (also for the right side lining).
(11) Sew together the "Body" (also for the right side lining) and the upper and middle parts of the "Sleeve" within the range of stitching stops, pressing open the seam allowance (S/A) with an iron.
(12) Sew bias tape to the edges of both the "Sleeve" and "Body."
* When sewing bias tape, ensure that the seam allowance (S/A) is open.
(13) Make incisions at the cutting positions on the "Front bodice," then fold with an iron to create a space for sandwiching the chest fabric (also for the right side lining).
(14) Stitch the two "Front bodice" pieces while sandwiching the chest fabric with topstitching.
(15) Sew bias tape to the edges of the "Front bodice."
(16) Serge/overlock the lower and upper sides of the "Sleeve," then sew the lower side of the "Sleeve," pressing open the seam allowance (S/A) with an iron.
(17) Sew edging bias tape to the lower opening of the "Sleeve."
(18) Sew the side of the "Sleeve" in a circular shape, pressing open the seam allowance (S/A) with an iron, then attach the lower part of the "Sleeve."
(19) Sew the upper side of the "Sleeve" in a circular shape, pressing open the seam allowance (S/A) with an iron, then attach the middle part of the "Sleeve."
* To maintain a clean shoulder line, keep the seam allowance (S/A) open by hand-sewing or similar methods after sewing the upper and middle parts of the "Sleeve."
(20) Sew together the sides of the "Front bodice" and "Back bodice," pressing open the seam allowance (S/A) with an iron (also for the right side lining).
* Make incisions at the hanging part of the seam allowance (S/A) to stabilize it.
(21) Apply stay tape to the back center line of the "Back bodice" (lining).
(22) Fold the seam allowance (S/A) of the back center line of the "Back bodice" with an iron to create a crease for inserting the open zipper (also for the right side lining).
(23) Stitch the two "Back bodice" pieces while sandwiching the open zipper.
(24) Finish sewing the remaining parts of the armhole.
(25) Sew bias tape around the neckline and hem.
(26) Sew buttons at the button positions and attach loops.
* If embedding studs or similar, attach them before sandwiching the chest fabric.
If you cannot see the SHOP due to 403 error
Price: ¥900 (JPY)
Approx. USD — / EUR — (for reference)
![]()

bast30.3in waist24.4in shoulder12.6in length19.9in 10sheets of A4 size(or legal size)
Sleeve parts 40 size
bast33.9in waist28.1in shoulder14.6in length21.7in 13sheets of A4 size(or legal size)
Sleeve parts 43 size
bast37in waist31.5in shoulder15in length22.4in 14sheets of A4 size(or legal size)
Sleeve parts 45 size
bast40.2in waist34.8in shoulder15.6in length23.2in 14sheets of A4 size(or legal size)
Sleeve parts 49 size
bast42.3in waist36.9in shoulder16.7in length24.2in 16sheets of A4 size(or legal size)
Sleeve parts 52 size

bast44.1in waist37.6in shoulder17.5in length25in 17sheets of A4 size(or legal size)
Expanded sleeve parts 56 sizes to 103%

bast45.9in waist38.8in shoulder17.1in length25.8in 18sheets of A4 size(or legal size)
Expanded sleeve parts 56 sizes to 102%